← Gazillion Industries/Reading material
Best low pass and high pass filter plugins
Gazillion Industries · · updated
A build in a small room, the low-pass crawling shut across eight bars, and
at the top of the sweep the thing goes papery and thin instead of getting tense. The filter did
exactly what it was told. It is simply a poor filter for that job.
For cleanup — rumble out, hiss off, bass moved aside — your DAW's stock EQ is
accurate, transparent and already paid for. For character, where the filter is the effect, four
things decide it: a slope you can change, resonance that stays musical near self-oscillation,
drive inside the filter path, and modulation locked to the session clock.
F(ilter)12 is
built for that second job and it is the worked example below; the rest of the field is named and
described as you go.
The short version
- Cleanup job
- stock EQ high-pass and low-pass; transparent, free, already loaded
- Character job
- F(ilter)12, $49 — five shapes, SLOPE as a knob from 18 dB per octave up to a wall, six resonance shapes that travel with the cutoff, DRIVE and DIRTY inside the filter, a lo-fi section in front
- The corner
- the frequency where output sits about 3 dB below the passband
- Slope
- 6, 12, 18, 24 dB per octave and steeper; steeper makes the filter an event
- The test
- sweep it loud with resonance up and listen for zipper noise and grit
- Also worth demoing
- Cytomic The Drop, FabFilter Volcano 3, u-he Filterscape, Xfer LFOTool
- Free and good
- Kilohearts Filter, MBandPass, Capacitor2, TDR Nova — accurate rather than colored, Capacitor2 excepted
Hear the filter move
Filter writing is almost entirely adjectives. Here is one loop through
F(ilter)12
at three positions and then swept, so the words above can be checked against the thing itself.
Open — filter 100, nothing removed
Filter 60 — peak falls to −8.49 dBFS
Filter 30 — peak falls to −13.68 dBFS
Swept — the gesture rather than the setting
One source loop, rendered offline through the same engine the plug-in runs, no other processing.
The peak figures are the renderer's own readout. Nothing else on this page is rendered; every other
product below is described from what its maker publishes.
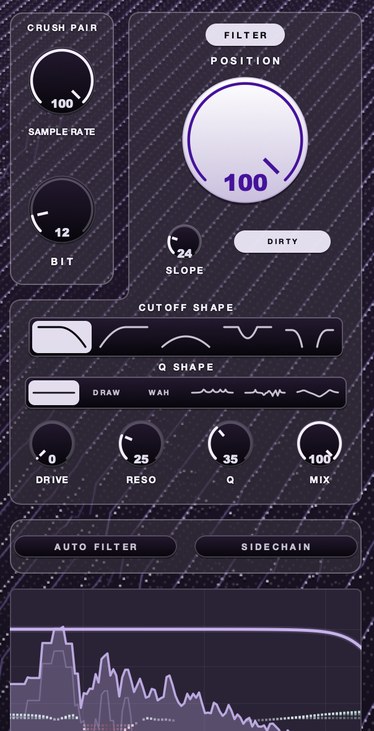 12 bit, full rate. Quantization without losing the top.
What a low-pass and a high-pass filter actually do
A low-pass filter passes content below a frequency and reduces content above it. A high-pass
does the opposite. The number on the knob is the corner, not a wall: the convention is the point
where the output sits about 3 dB below the passband, and past that point level falls at a rate
set by the slope, measured in decibels per octave.
The arithmetic is worth holding in your head because it explains most of what surprises
people. At 12 dB per octave with the corner at 1 kHz, a tone at 2 kHz comes out about 12 dB
quieter and a tone at 4 kHz about 24 dB quieter. At 24 dB per octave those numbers double. Same
knob position, same displayed frequency, a completely different sound — which is why
comparing two filter plugins at the same cutoff tells you nothing until you have matched the
slopes.
The other thing a filter does, and the thing nobody puts on the box, is rotate phase. A
minimum-phase filter shifts the phase of everything near its corner, and a second-order design
approaches a full 180 degrees of rotation across that region. So a high-pass on a kick drum
changes the relationship between that kick and an untouched bass part, even though you only
removed content from one of them. Linear-phase designs avoid the rotation and pay for it with
latency and pre-ringing. Most of the time you want the minimum-phase version and you want to
check the result in mono, where a phase shift you could not hear in stereo turns into a level
change you can.
Resonance is the third piece. Feed some of the filter's output back into its input and the
loop reinforces frequencies right at the corner while thinning the response either side. That
peak is the reason a filter sweep has a voice instead of just getting darker. Push the feedback
far enough and the loop sustains itself: the filter oscillates and produces a near-sine tone at
the cutoff frequency with no input at all. Filter cutoff and resonance covers that relationship in
more detail than this page needs.
Cleanup filtering and character filtering are two different jobs
Almost every argument about the best low pass filter plugin is really two arguments that got
mixed together. One is about removing material you do not want. The other is about making the
removal audible on purpose.
Cleanup wants a filter that disappears. You are taking 30 Hz of subsonic energy off an
acoustic guitar, or pulling the top off a sampled loop so it stops fighting the hats. You want
an accurate corner, a steep-enough slope, no added harmonics, no resonant bump, no CPU cost worth
measuring. Your DAW's stock parametric EQ does this perfectly. Buying a plugin to do it is
buying a nicer-looking version of something you own.
Character wants the opposite. You want to hear the corner move. You want the resonance to
whistle, the drive to thicken the passband as the filter closes, and the whole gesture to arrive
on the downbeat. Now the stock EQ is the wrong tool, because it was designed to be inaudible in
exactly the way you are trying to be audible. This is the job a dedicated filter plugin exists
for, and it is the job where the differences between products are large enough to hear on a
phone speaker.
Decide which job you have before you shop. A producer who buys a $99 character filter to
high-pass their vocals has bought a beautiful thing and will never hear what it cost. Everything
from here is the character job, and the settings are written for
F(ilter)12
because that is the one we can render and show you.
What separates a good filter plugin from a bad one
Seven things, in rough order of how often they decide the outcome. None of them appear in
marketing copy in a form you can compare, so each one is worked on our own filter first and then
set against what the rest of the field publishes.
1. Slope you can change, across a useful range. A filter locked at 24 dB per
octave is a filter with one personality. Gentle slopes shade a sound; steep slopes turn the
filter into an event. On F(ilter)12 the slope is a knob rather than a switch, running from 18 dB
per octave up to a wall where almost nothing gets past, so steepness is something you ride during
the sweep instead of choosing before it. FabFilter's Volcano 3 feature list notes a 6 dB per
octave slope option added in that version, which is the shallow end and the one people miss most,
because a 6 dB slope is what you use when you want the filter to be felt rather than heard.
2. Resonance that behaves near the top of its range. Every filter sounds fine
with resonance at 20%. The question is what happens at 90%, where cheap designs go from a peak to
a screech with nothing in between, or start clipping internally and spraying harmonics you did
not ask for. F(ilter)12 splits the problem in two: RESO sets how much and Q sets how narrow, and
then Q SHAPE decides what the resonance actually is. WAH is one strong peak at the cutoff, VOWEL
is four peaks spaced like a voice, COMB alternates peaks and nulls, SCOOP lifts both ends and
pulls the cutoff down between them, PLAIN adds nothing, and DRAW is whatever you click into the
display. The peaks sit at fixed distances from the corner, so the shape travels with the knob
rather than the sweep crawling through a bump that stays put. Cytomic's page for The Drop states
that each of its filters will self-oscillate at high resonance, and that a safe button can
prevent it when you do not want that — the presence of a deliberate control for the edge
case tells you the edge case was designed rather than tolerated.
3. Drive in the filter path, not after it. A saturator placed after a filter
adds harmonics above the cutoff you just removed. Saturation inside the filter loop, where the
resonance and the nonlinearity interact, is a different sound and the reason character filters
are worth paying for at all. F(ilter)12 puts it in two places. DRIVE drives the filter itself
rather than the signal arriving at it, and DIRTY feeds the filter's own distortion back through
itself; switch DIRTY off and the same filter runs clean, which is the A/B that tells you what the
feedback was doing. Volcano 3 lists a Drive setting per filter that adjusts internal filter
saturation, which is the same architecture.
4. Modulation that syncs to the session. A filter with an LFO that only runs
in Hz is a filter you will automate by hand forever. You want host-synced divisions, an envelope
follower, and ideally a drawable shape. F(ilter)12 carries both movers and runs one at a time,
because two things driving the same cutoff means neither knob does what it says. AUTO FILTER
hands the cutoff to a clock: a shape, a division, a grid, SWING to push it off the grid, and
PHASE for where in the shape each cycle starts. SIDECHAIN hands it to a signal instead —
what it follows, what it hears, which way it travels, how far, and how eagerly it makes up its
mind. Elsewhere in the field: Xfer Records lists LFOTool with a point-and-tension curve editor,
twelve graphs in a preset switchable by MIDI note or automation, and rate in BPM with optional
swing or in Hz. u-he's Filterscape page lists two host-synchronized sequencers of up to sixteen
steps with a glide control, two host-synchronized LFOs with eight waveforms, and four envelope
followers.
5. Aliasing, suppressed or served on purpose. Any nonlinearity generates
harmonics, and harmonics above half the sample rate fold back down as inharmonic content that
sits in the mix like grit in a bearing. Most filters treat that purely as a defect. Cytomic's
page is unusually direct about it, calling aliasing an unavoidable result of nonlinear processing
on a computer, and offers separate oversampling settings for realtime use and offline renders
with x2 and x8 as its recommended pair; FabFilter's Volcano 3 list carries a High Quality option
that enables maximum internal oversampling. F(ilter)12 gives you the other direction as well,
because SAMPLE RATE in the lo-fi section lowers the rate deliberately: the top goes, and what was
up there folds back down as new content sitting in front of the filter. That fold-back is the
grit you reach for when the filter is the effect rather than the fix.
What aliasing sounds like is the short
version.
6. Smooth cutoff under automation. A filter whose cutoff parameter updates
once per processing block, without interpolation, will step audibly when you automate it fast.
You hear it as a soft click on every block boundary, worst on sustained low content and most
obvious on a slow sweep under a pad. This is pure implementation quality and it is invisible on a
feature list, which is the whole reason the swept clip near the top of this page is a render
rather than a sentence. Play it, listen to the travel, and do the same with every demo you
download.
7. Latency and load. Oversampling costs latency, linear phase costs more, and
a filter you put on thirty channels costs CPU thirty times. Know which mode you are in before you
track through it. Cytomic notes that disabling all oversampling in The Drop gives zero latency.
We publish zero samples of latency for F(ilter)12 at whatever rate your session runs, which is
the figure to check on anything you intend to record through rather than mix into.
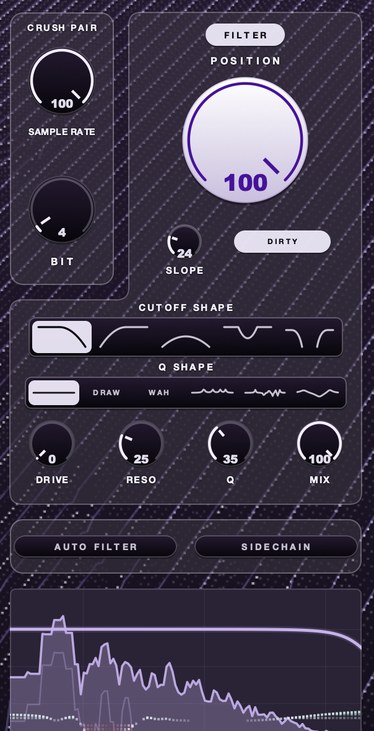 4 bit at 8 kHz. Bits make it grainy, the rate makes it clang.
How to test a low pass filter plugin in ten minutes
Demo versions are free and nearly everyone judges them on presets, which tells you about the
preset designer. Here is a test that tells you about the filter. Run it on the same eight-bar
loop every time, so that after three plugins you have a memory to compare against. The
F(ilter)12
demo is on its page if you want a reference to run the test against first.
- Load the plugin on a loop with content across the whole spectrum: drums, bass and a bright
sustained element.
- Set the filter to low-pass, resonance at zero, and match the slope to 24 dB per octave.
- Sweep the cutoff slowly from 20 kHz down to 100 Hz by hand and listen for stepping,
clicking or zipper noise.
- Repeat the sweep with resonance at 90% and listen to what happens between musical peak and
screech.
- Park the cutoff at 300 Hz with high resonance and leave it for thirty seconds to check for
runaway self-oscillation.
- Turn any drive or saturation control to maximum and sweep again, listening above the cutoff
for aliasing that rises as the corner falls.
- Switch the slope from 6 to 24 dB per octave at a fixed cutoff and confirm the level change
is what the slope predicts.
- Automate the cutoff over one bar at 140 BPM and bounce the result, then listen to the bounce
rather than the realtime playback.
- Check the bounce in mono and on a phone speaker.
- Note the reported latency in the DAW with every quality option on.
Two things usually decide it. The sweep with resonance up separates designs that were voiced
from designs that were merely implemented, and the phone speaker check tells you whether the
resonant peak you fell in love with lands anywhere your listener can hear. A 3 kHz peak that
reads as character on monitors reads as earache through an earbud on a train.
Where the filter goes in the chain
Order changes the result more than the plugin choice does, and the rules are short.
Cleanup goes first. A high-pass before a compressor stops subsonic energy from
triggering gain reduction that has nothing to do with what you hear. On a vocal that means a
high-pass ahead of the compressor rather than after it, so that a door slam two rooms away stops
ducking the chorus.
Character goes where you want the color. A resonant low-pass before a
saturator gets its resonant peak distorted, which fattens the peak and blurs it. The same filter
after the saturator cuts the harmonics the saturator just made, which is darker and cleaner. Both
are correct and they sound nothing alike, so make it a decision rather than an accident. This is
also the argument for drive living inside the filter: with F(ilter)12 the DRIVE and DIRTY stages
sit in the loop, so the order question stops being a chain problem and becomes one knob.
A filter on a send is a different instrument. Put a band-pass on an aux, feed
it from the drum bus, and ride the send: you get the filtered version as a layer under the dry
one instead of replacing it. This is how most of the good telephone and small-radio sounds are
made, and it is what the telephone effect
on vocals actually is under the hood.
On the master, be careful and be specific. A high-pass at 20 to 30 Hz on the
mix bus removes energy that costs headroom and reaches no consumer speaker. A resonant sweep on
the master is a production choice, not a mixing one, and it will move a limiter around in ways
that have nothing to do with the music.
F(ilter)12 is the
filter this page has been working with: five shapes including a morph that runs from a closing
low-pass, through untouched in the middle, to an opening high-pass, a SLOPE knob from 18 dB per
octave up to a wall, six resonance shapes that travel with the cutoff, DIRTY for the filter's own
distortion fed back through itself, and a lo-fi section in front. $49, Mac and Windows, DRUGS
included free, and there's a demo on the page.
Filter plugins worth knowing, ours first
Everything in this section comes from a maker's own page, read today. Where a price is not
published in a form that can be read from the page, no price appears here.
F(ilter)12. The recommendation on this page, and the one every setting above
was written for. Five filter shapes — low-pass, high-pass, band-pass, notch, and a morph
that runs from a closing low-pass, through untouched in the middle, to an opening high-pass
— with SLOPE as a knob from 18 dB per octave up to a wall, DRIVE, RESO, Q and MIX, and
DIRTY to feed the filter's own distortion back through itself. Six resonance shapes sit on the
filter at fixed distances from wherever it is, so the whole shape travels with the cutoff: WAH,
VOWEL, COMB, SCOOP, PLAIN, and DRAW, which you build by clicking points into the display and
right-clicking one for a bell, notch, shelf or cut. In front of the filter sits a lo-fi section,
SAMPLE RATE and BIT, where twelve bits is as clean as it gets. On top sits AURA, an adaptive
correction that only shapes what the filter lets through. AUTO FILTER and SIDECHAIN move the
cutoff, one at a time. $49, with AU, VST3 and a standalone on macOS 10.13 or later, VST3 on
Windows 10 or later, zero samples of latency, whole-plug-in bypass, and DRUGS included free.
Hear
it on its own page.
Cytomic The Drop. Cytomic's page describes The Drop as a resonant filter
plugin based on classic analog synth filter circuits alongside new designs, and lists eleven
filter circuits in one plugin, including high-pass versions of several designs that originally
existed only as low-pass. It carries both a high-pass and a low-pass that can run in series or
parallel, in High Detail or Medium Detail modes; two envelopes that behave either as AHR
envelopes or as envelope followers for auto-wah effects; an LFO that reaches audio rate and
re-syncs itself to the nearest bar; and a visualizer that draws the combined response and the
modulated position of both filters. Cytomic lists it at $99 as a one-time purchase with no
subscription, in VST2, VST3, AUv2 and AAXv2 for macOS 10.13 or above and Windows 10 or above,
with a trial download. The oversampling notes on that page are the most honest writing about
aliasing on any filter product page we have read.
FabFilter Volcano 3. FabFilter's page describes four filters with flexible
routing including per-channel and mid/side modes, each offering filter shapes that now extend to
nonlinear bell, low and high shelf, notch and all-pass, with a Drive setting per filter that
adjusts internal saturation. The modulation section lists sixteen-step XLFOs, XY controllers,
envelope generators, envelope followers and MIDI sources, connected by drag and drop. It also
lists a 6 dB per octave slope option, Level and Pan per filter for parallel routings, a High
Quality oversampling option, stereo and mono versions, and availability in VST, VST3, Audio
Units, AAX Native and AudioSuite. FabFilter dates the first Volcano to 2005 and offers a 30-day
trial.
u-he Filterscape. u-he sells Filterscape 1.5 as a trio — an effect, a
six-band EQ and a virtual-analog synth — at 129 euro, with macOS, Windows and Linux builds,
Linux described by u-he as beta. The effect lists two multimode filters, each with mixable
lowpass, bandpass, highpass and notch outputs, plus nine additional analog filter options in
2-pole, 3-pole and 4-pole configurations added in 1.5. On top of that sits a four-band parametric
EQ with five band layouts and eight morphable snapshots you can blend between, two host-synced
sequencers of up to sixteen steps, two host-synced LFOs with eight waveforms, four envelope
followers, a stereo delay and five routing options. u-he dates the original release to 2004.
Xfer Records LFOTool. Listed at $49.95 USD. It is a modulation tool with a
filter attached rather than a filter with modulation attached, and for rhythmic filtering that is
a useful shape to know about. Xfer lists a customizable point-and-tension curve editor, twelve
graphs per preset switchable by MIDI note or automation, up to four graphs running at once across
cutoff, resonance and pan, rate in BPM with optional swing or in Hz, sample-accurate sync, and
optional MIDI CC output to drive other instruments. macOS and Windows versions are included
together; the page lists macOS 10.11 or later and Windows 7 SP1 or later, and a demo limited to
fifteen minutes.
FabFilter Pro-Q 4. Named here because the cleanup argument always drags an EQ
into a filter discussion. FabFilter lists linear phase operation alongside zero latency and
Natural Phase modes, dynamic and spectral EQ, per-band mid/side processing, surround support up
to Dolby Atmos 9.1.6, an intelligent solo feature, optional Auto Gain, a customizable spectrum
analyzer, and an EQ Sketch feature for drawing a curve in one gesture. Worth knowing before you
spend anything on that job: the stock EQ already in your DAW does a high-pass on a vocal
accurately, and it does it for nothing.
The best free low pass filter plugin options, and the free high-pass ones too
Our free plug-in is DRUGS,
a one-knob bus compressor for drums, free for Mac and Windows and also included with F(ilter)12.
It is not a filter, so it is not the answer to this heading — though if you landed here
because a low-passed drum loop went soft and lost its push, that is the tool for the second half
of the problem. On filters themselves the free tier is unusually strong, which is bad news for
anyone selling a plain filter and good news for you. Four worth having, all verified from the
maker's own page.
Kilohearts Filter. Free with a Kilohearts account. The page lists a resonant
filter with seven modes — low pass, band pass, high pass, notch, low shelf, peak and high
shelf — with a Cutoff knob, a Q knob and a Gain control for the shelf and peak types.
Kilohearts defines the cutoff exactly the way this article does: in a low-pass, the frequency
where the signal is reduced by 3 dB. It runs as a normal VST, AU or AAX plugin and also as a
Snapin inside Phase Plant, Multipass and Snap Heap, which is the part that makes it worth
installing even if you already own a filter. Part of the free Kilohearts Essentials collection.
MeldaProduction MBandPass. Free, inside MFreeFXBundle, which Melda's page
lists as 38 free effects. MBandPass is described as a filter plugin containing high-pass and
low-pass filters with slopes up to 120 dB per octave, with two modulators that can follow an LFO
or react to input level, MIDI note or input pitch. A 120 dB per octave slope is a brick wall by
any reasonable definition and there are very few free plugins that will give you one. Melda is
clear that the free versions are feature-limited against the paid ones — its own upgrade
list names preset management, the modulators, upsampling and interface resizing as things the
license unlocks — so treat the free build as the filter itself rather than the whole
instrument. The same bundle includes MComb, a multi-comb filter, for anyone who wants the weirder
end.
Airwindows Capacitor2. Free and open source, with no DRM, in Mac AU and Mac,
Windows and Linux VST. It gives you a Lowpass and a Highpass control plus a NonLin control that
takes it from barely-there to extreme, and the author's own description of the mechanism is that
the input signal modulates the cutoff frequency, in the manner of a capacitor whose capacitance
drops under voltage. Airwindows lists it as zero latency and files it under Filter. It has no
interface to speak of, which is either the point or the problem depending on your temperament.
Posted July 2020 and still the most distinctive free filter we know of.
Tokyo Dawn Labs TDR Nova. Free, and the one to reach for when the honest
answer to "best free high pass filter plugin" is an EQ. Tokyo Dawn describes it as a parallel
dynamic equalizer with four dynamic EQ bands plus additional high-pass and low-pass filter
sections, a spectrum analyzer, and equal-loudness helpers for comparing settings without being
fooled by level. Current version listed as 2.2.2, with a paid Gentleman's Edition available
separately.
One honest note about the free tier: three of those four are filters that do not try to have a
personality, and Capacitor2 is doing most of the work on that shelf by itself. The moment you
want the filter to color the signal on the way through — drive interacting with resonance,
a shape that travels with the cutoff, crush sitting in front of it — you have left the free
shelf, and F(ilter)12
is $49 with DRUGS in the box.
12 bit, full rate. The lo-fi section sits in front of the filter.
High-passing every channel: the argument both ways
The advice to put a high-pass on every track is the most repeated instruction in home mixing
and the most often misapplied. Both sides of it are right about something.
The case for it is arithmetic. Content below roughly 40 Hz carries real energy, reaches almost
no consumer playback system, and eats the headroom your limiter needs. Thirty channels each
carrying 30 Hz of nothing sum into a mix bus that is working hard on material nobody will hear.
Removing it buys you level for free, and it costs nothing you can hear on any playback system
your listener owns.
The case against it is that the instruction usually arrives without a frequency, so people set
a high-pass at 100 Hz on everything and remove the body of the record along with the rumble. A
male vocal has real content at 100 Hz. A snare's weight sits between 150 and 250 Hz. Filter those
out on every channel and you get a mix that is clean, quiet and lifeless, and then you spend an
evening trying to add back with saturation what you removed with a filter.
The workable version: high-pass low, steeply, and only where you have heard the problem. Set
the corner at 20 to 35 Hz on most sources, sweep up only until you hear the source change, then
back off. Bypass the filter and see whether you miss it. If you cannot hear a difference either
way, leave it in for the headroom and move on.
A low pass filter VST versus an EQ: when each one wins
They overlap and the overlap confuses people, so here is the line. An EQ's low-cut and high-cut
are filters, usually with a selectable slope and sometimes a resonance control. For a fixed
setting you will never touch again, that is the whole answer, and reaching for a separate plugin
adds a window and no sound.
A dedicated filter wins in three situations. When you want to move the cutoff musically, because
a filter plugin is built to be swept and an EQ band is built to sit still. When you want the
resonance to be the sound rather than a side effect, because most EQ low-cuts cap resonance at a
gentle bump. And when you want drive interacting with the filter, which almost no EQ offers,
because an EQ that distorted when you moved a band would be a broken EQ.
Those three are the three F(ilter)12 is arranged around: AUTO FILTER and SIDECHAIN for the
movement, RESO with Q SHAPE for resonance that is the sound rather than a bump, DRIVE and DIRTY
for the interaction. If none of the three describes your problem, keep the EQ and save the $49.
There is a fourth, quieter case: automation resolution. Filter plugins are generally written
with fast cutoff automation as the primary use case, and their parameter smoothing reflects that.
EQ bands often are not, which is why sweeping an EQ's low-cut across a bar sometimes steps in a
way that the same sweep on a filter plugin does not.
Filters by source
The same filter does four different jobs depending on what you feed it, and the settings are
not transferable.
Drums. Low-passing a drum loop is the fastest way to push it behind the lead
element without turning it down. Start at 6 or 12 dB per octave around 6 to 8 kHz, which shades
the cymbals without killing the snare's crack. Steep slopes on drums get obvious fast because
transients contain energy right across the spectrum, so a brick wall at 4 kHz reads as a
deliberate effect rather than a balance move. If you want the effect, commit to it: pull the
corner down to 1 kHz, add resonance, and let it be a choice. On F(ilter)12 that is POSITION down,
SLOPE past the middle, RESO up and Q SHAPE set to WAH, so the peak rides the corner all the way
down instead of the sweep walking past a fixed bump.
Bass and 808s. A low-pass on a sub is usually a mistake, since there is
nothing up there to remove and the phase rotation near the corner will change how the note lines
up with the kick. A high-pass on a sub at 25 to 30 Hz is usually right, since the content below
that is inaudible on real systems and expensive in headroom. If the bass needs to sound smaller,
reach for saturation before you reach for a filter, because harmonics survive a phone speaker and
fundamentals do not.
Vocals. High-pass ahead of the compressor, set by ear at 20 to 35 Hz on a
close-mic'd take unless there is proximity buildup to tame, in which case sweep up carefully and
stop the moment the chest disappears. Use the stock EQ for that one. A resonant low-pass on a
vocal is an effect rather than a fix, and it belongs on a duplicate track or a send so you can
blend it against the dry — MIX on F(ilter)12 does the same job without the extra track.
Full mixes and loops. Sweeping a low-pass across a full mix is the classic
build, and it works because a mix has content at every frequency, so you hear the corner travel
through it. Sweeping the same filter across a sine bass does almost nothing for most of the
travel and then does everything at once. That difference is the whole reason filter sweeps sound
good on some sources and broken on others.
Moving the filter: automation, LFOs and envelope followers
A static filter is a tone control. The value in a filter plugin is mostly in how it moves, and
there are three ways to move it, each with a different feel.
Drawn automation is the most controllable and the most work. It is the right
choice for a one-off build, where the shape needs to follow the arrangement rather than a grid,
and where you want the sweep to land precisely on a downbeat. Draw it over bars for a build and
over beats for a groove. How to make a
filter sweep has the timing.
A synced LFO is the rhythmic option and the one people overuse. A sawtooth
falling over a quarter note gives you the pumping filter that has carried dance records for
thirty years; a triangle over two bars gives you a slow breath. The controls that matter are the
division, the depth, and where in the cycle the shape starts, because an LFO that begins in the
wrong place turns a groove into a stumble. AUTO FILTER on F(ilter)12 is this with those controls
on the panel rather than buried: shape, division, grid, SWING to pull it off the grid, and PHASE
for where each cycle starts. The auto filter
effect is the same idea in its simplest form.
An envelope follower ties the cutoff to the level of a signal, which is what
makes an auto-wah. Feed it the track itself and the filter opens on every hit. Feed it a
different track and you have a filter that ducks the pad whenever the kick lands, which is more
interesting than the sidechain compression everybody reaches for and far less common. Attack and
release times matter more than the depth here: too fast and it chatters, too slow and it lags
behind the groove. SIDECHAIN on F(ilter)12 is that follower, and it takes an external input, so
the kick can drive a filter sitting on something else entirely.
Numbers to start from
These are starting points, not settings. Print nothing on a sticker.
- Set a high-pass at 25 Hz, 24 dB per octave, on every channel that is not a kick or a sub.
- Set a high-pass at 20 Hz, 12 dB per octave, on the mix bus and leave it there.
- For a build, automate a low-pass from 20 kHz to 400 Hz over eight bars, resonance at 30%.
- For a telephone sound, band-pass between 400 Hz and 3 kHz at 24 dB per octave on a send.
- For a distant-room sound, low-pass at 2 kHz, 12 dB per octave, and add reverb after it.
- For a filtered drum layer, low-pass at 800 Hz with resonance at 60% and blend it under the
dry loop.
- On F(ilter)12, start a character move at SLOPE around the middle, RESO at 40%, Q SHAPE on
WAH and MIX full, then pull MIX back until the dry signal comes through underneath.
- Compensate output level after every one of these, because filters change loudness and your
ear votes for the louder version.
What it costs you
Filtering is subtraction, and subtraction is permanent in the mix even when it is reversible in
the session. Three costs are worth stating plainly.
The first is level and phase. Every filter rotates phase near its corner, and stacking six of
them across a drum kit produces a low end that measures fine and sounds slightly wrong, with no
single plugin to blame. Fewer filters, set lower, cost less.
The second is resonance eating headroom. A resonant peak is a boost, and every dB of peak is
level you give back somewhere else. A high-resonance filter on a bus will push a limiter around
in ways that track the filter rather than the music, and the meters will not tell you that is
what happened.
The third is familiarity. The resonant sweep into a drop is one of the most recognizable
gestures in recorded music. Use it on every transition and the listener hears the gesture instead
of the change, in the same way a fourth key change stops being a lift. Spend it once per record
and it still works.
Questions people ask
What is the best low pass filter plugin?
For transparent cleanup, the low-cut and high-cut in your DAW's stock EQ, because the job wants
accuracy and nothing else. For character work, F(ilter)12: five shapes, SLOPE as a knob from 18 dB
per octave up to a wall, six resonance shapes that travel with the cutoff, DRIVE and DIRTY inside
the filter path, a lo-fi section in front, $49 with DRUGS included. The rest of the field worth
demoing before you decide: Cytomic's The Drop and FabFilter's Volcano 3 publish the two most
complete feature sets in the category, and Xfer's LFOTool is a different shape again if what you
want is rhythmic movement rather than filter tone.
What is the best free low pass filter plugin?
Kilohearts Filter is the most useful free general-purpose one: seven modes, free with an
account, and it doubles as a Snapin inside Kilohearts' modular hosts. For a brick wall, Melda's
MBandPass in the free MFreeFXBundle publishes slopes up to 120 dB per octave. For a free filter
with a personality, Airwindows Capacitor2 is free and open source with a nonlinearity control that
nothing else on the free shelf matches. Ours is not free — F(ilter)12 is $49 — so if
the budget is zero, take Capacitor2 and come back when you want the filter to drive.
What is the best free high pass filter plugin?
The same three cover it, since every one of them offers a high-pass alongside the low-pass. If
the high-pass is going on a vocal or a mix bus, TDR Nova is free and gives you high-pass and
low-pass sections alongside four dynamic EQ bands and an analyzer, which is more useful on a
channel strip than a standalone filter would be.
Is a low pass filter VST different from a low pass filter plugin?
No. Searches for the best low pass filter VST and the best high pass filter VST land on the
same products as the plugin searches, because VST is one format among several — VST3, Audio
Units and AAX are the others you will meet — and the same product usually ships in all of
them. Check which formats your DAW loads before buying: F(ilter)12, for one, installs as an AU
and a VST3 plus a standalone on macOS and as a VST3 on Windows, and a Mac user running Logic
wants the AU build even when the marketing says VST.
What is the best high pass filter plugin for vocals?
A clean parametric EQ, set low, and the one already in your DAW will do. Vocal high-passing is
a cleanup job, so it wants accuracy and no added resonance, and it wants to sit ahead of the
compressor so that rumble stops driving gain reduction. Set the corner between 20 and 35 Hz to
start, sweep up only until the voice changes, then back off until it does not. This is the one
job on this page a character filter is the wrong tool for, ours included.
Do I need a filter plugin if my EQ already has a high-pass and a low-pass?
For cutting, no. Buy a filter plugin when you want to move the cutoff as a musical gesture,
when you want resonance strong enough to sing, or when you want the filter to drive and distort as
it closes. Those three are the things an EQ is specifically designed not to do, and they are the
three F(ilter)12 is arranged around.
Is F(ilter)12 a low pass and high pass filter plugin?
Yes, among five shapes: low-pass, high-pass, band-pass, notch, and a morph that runs from a
closing low-pass, through untouched in the middle, to an opening high-pass. SLOPE is a knob from
18 dB per octave up to a wall, so the same plug-in covers a gentle shade and a brick wall without
changing tools. It is $49 for Mac and Windows, AU, VST3 and standalone, with DRUGS included free
and a demo on the product page.
What F(ilter)12 does
F(ilter)12 is a filter with a lo-fi section in front of it and an adaptive correction called
AURA on top. POSITION sets where in the spectrum the filter sits, and the further
it works the more it drives and the more it sings, built in rather than dialed in. There are five
shapes: low-pass, high-pass, band-pass, notch, and a morph that runs from a closing low-pass,
through untouched in the middle, to an opening high-pass. SLOPE is a knob, from
18 dB per octave up to a wall where almost nothing gets past. DIRTY feeds the
filter's own distortion back through itself, and off, the same filter runs clean.
RESO decides how much resonance and Q decides how narrow,
with DRIVE and MIX alongside them. Q SHAPE puts
peaks and dips at fixed distances from wherever the filter is, so the whole shape travels with the
knob: WAH is one strong peak at the cutoff, VOWEL is four peaks spaced like a voice, COMB
alternates peaks and nulls, SCOOP lifts both ends and pulls the cutoff down between them, PLAIN
adds nothing, and DRAW is your own, built by clicking points into the display.
Moving it happens two ways, one at a time. AUTO FILTER hands the cutoff to a
clock — a shape, a division, a grid, SWING to push it off the grid and PHASE for where in
the shape each cycle starts. SIDECHAIN hands it to a signal instead: what it
follows, what it hears, which way it travels, how far, and how eagerly it makes up its mind. In
front of all that, SAMPLE RATE and BIT are the crush pair, and
twelve bits is as clean as it gets. It is $49 for Mac and Windows, AU, VST3 and standalone, with
zero samples of latency, and DRUGS is included free.
Back to the build in the small room. Pick the slope first, then the resonance, then decide
whether you want the filter heard or felt. The sweep gets tense instead of thin.
F(ilter)12 — a 12 bit sauce filter for Mac and Windows: a lo-fi section,
five filter shapes, six resonance shapes and AURA.
Hear it
Keep reading
- Filter cutoff and resonance explained — The corner frequency, the slope, the resonant peak, and what each costs.
- How to make a filter sweep — High-pass and low-pass builds, automation curve, resonance, and what to sweep.
- How to use an auto filter — LFO and envelope modes, sidechain filtering, and keeping it in the groove.
- What is aliasing in audio — What it is, what it sounds like, how to prevent it, and how to use it on purpose.
- How to make a telephone effect on vocals — The band-pass, the compression, and the modern cell-phone version.
- Ladder filter explained — What a ladder filter is, and the low end resonance takes away.