← Gazillion Industries/Reading material
Best monosynth VST
Gazillion Industries ·
The bass line owns the room on monitors and disappears in the car. Four saw
layers, detuned, a chorus over the top, and somewhere in the stacking the note stopped being a
note. You can hear the arrangement working; you cannot hear the pitch.
The best monosynth VST is the one you can play: glide that tracks the interval, envelopes
fast enough to put an attack on the front of a note, and a filter that stays musical with
resonance up. One voice at a time is the point, because everything the instrument has goes into
that voice. JOURNEYMAN
is $59, carries all three, and is the synth worked through below. Then the architecture, a
ten-minute test, six patches, and the other plug-ins people name.
The short version
- What a monosynth is
- a synthesizer that sounds one note at a time
- Why one voice
- glide, note priority and the whole engine spent on a single line
- What decides quality
- envelope speed, resonance that stays playable, glide that tracks
- What to use
- JOURNEYMAN, $59 — three oscillators, two ladder filters, 200 programs
- Free route
- Surge XT or Odin 2, both free, both polyphonic synths you hold to one voice
- What it costs
- no chords, and one slow envelope setting flattens the groove
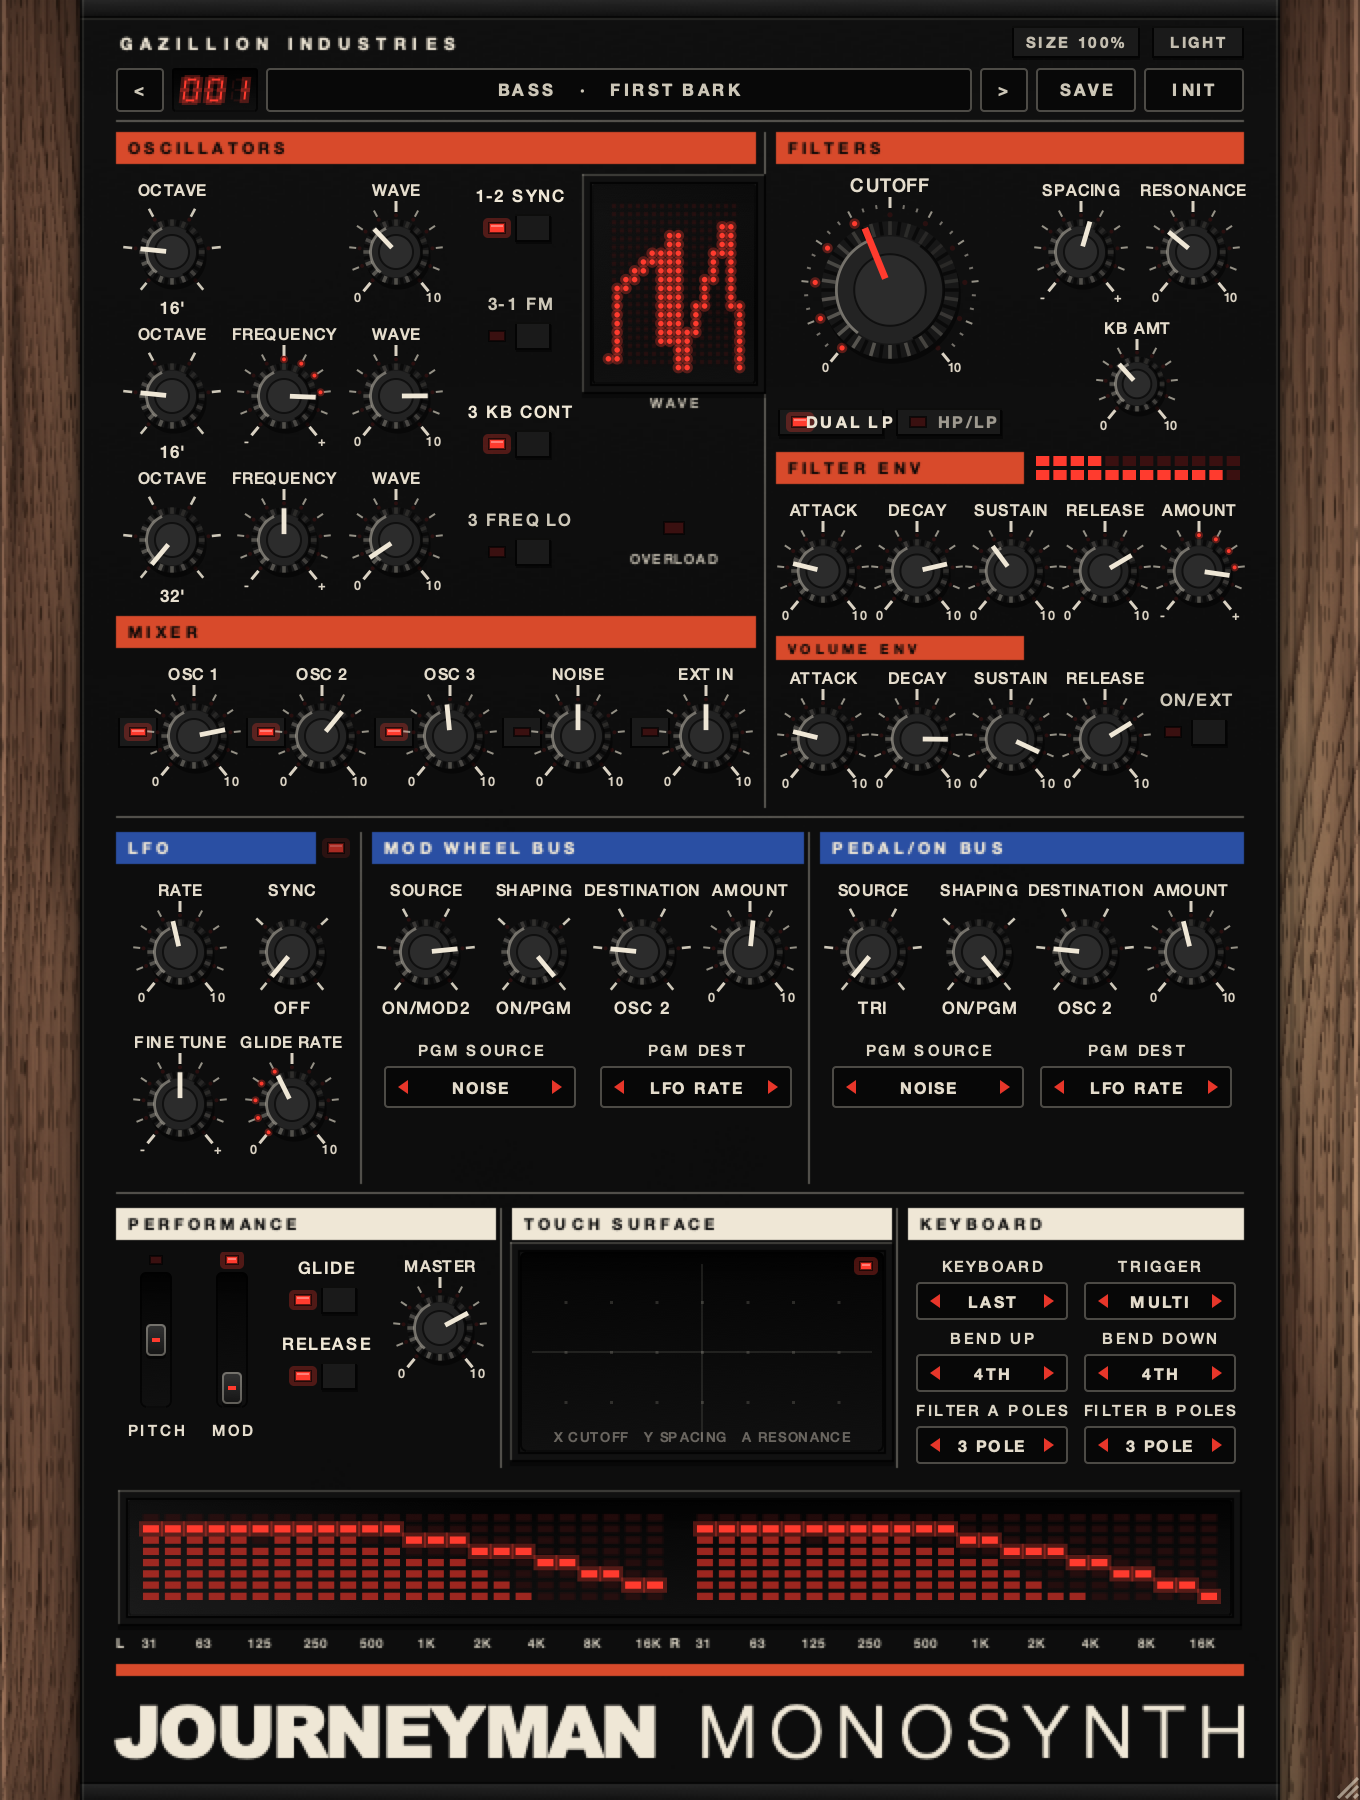 One voice, laid out left to right. Oscillators into the mixer, the mixer
into two filters, the filters into an amplifier the volume envelope opens and closes.
One voice, laid out left to right. Oscillators into the mixer, the mixer
into two filters, the filters into an amplifier the volume envelope opens and closes.
What a monosynth plugin actually is
A monosynth sounds one note at a time. Play a second key while the first is held and the
instrument does not start a second voice; it moves the voice it already has to the new pitch.
That single rule is what separates the instrument from a polysynth set to one voice, and it is
what every technique below is built on.
The consequence is that a monosynth cannot play a chord. Stack three notes in the piano roll
and you will hear one of them, chosen by whatever priority rule the synth uses. If you want the
chord, you run three instances or you write it on something polyphonic. A monosynth plugin is
for the line: bass, lead, counter-melody, a riser, a bleep on the offbeat.
What you get back for that restriction is control. Every oscillator, every filter and every
modulation source is pointed at a single note, so a small move is audible immediately, and the
gestures that only make sense on one voice — glide between two pitches, a filter sweep that
belongs to the phrase rather than to a chord — become the instrument's whole personality.
Glide, and why it only exists here
Glide is the time the pitch takes to travel from the old note to the new one. Set it to 0 ms
and notes step. Set it to 120 ms and a fifth slides. On a polysynth the idea barely works,
because there is no single "old note" to travel from when four voices are ringing. On one voice
the origin is never in doubt.
Glide time is either constant time or constant rate. Constant time means every interval takes
the same number of milliseconds, so an octave and a semitone both take 120 ms and the octave
sounds faster. Constant rate means the pitch travels at a fixed speed, so the octave takes twelve
times as long as the semitone. Bass lines usually want the second; a lead usually wants the first.
Note priority and trigger modes
Note priority decides which held key wins. Low-note priority keeps the bottom of whatever you
are holding, which is the usual choice for bass. High-note priority keeps the top, which suits a
lead where you want trills to read. Last-note priority follows your fingers exactly and is the
most literal of the three.
Trigger mode decides whether the envelopes restart. Single trigger, sometimes called legato,
leaves the envelope running when you play a new note while the old one is held, so an overlapping
phrase keeps one continuous shape. Multi trigger restarts the envelope on every note, so each
note gets its own attack. Overlap two sixteenths at 120 BPM, which is 125 ms each, and the
difference between the two modes is the whole feel of the line.
The parts of a monosynth, in signal order
Almost every monosynth, in hardware or in a plug-in, runs the same chain. Oscillators make
raw waveforms, a mixer sets their balance, a filter removes what you do not want, an amplifier
shaped by an envelope decides when you hear it, and a set of modulators move the rest while you
play. Know the chain and every panel you meet becomes readable.
Oscillators
An oscillator produces a repeating waveform at a pitch. A triangle is nearly a sine with a
little edge. A sawtooth carries every harmonic and is the default for anything that needs to
sound big. A square carries odd harmonics only and sounds hollow, woody, faintly clarinet.
Narrow the square into a pulse and it thins out and starts to buzz.
Two or three oscillators together is where the size comes from. Tune one an octave down for
weight, or detune two by a few cents against each other for movement. The arithmetic is worth
knowing: two oscillators three cents apart at 110 Hz differ by 0.19 Hz, which is one
slow swell every 5.2 seconds. Ten cents apart at 55 Hz is 0.32 Hz, a swell every 3.1
seconds, and on a sustained bass note that is already too much movement. Our piece on
detune works through what those beat rates do
in a mix.
Two other oscillator tricks show up constantly on monosynths. Hard sync locks one oscillator's
cycle to another's, so sweeping the synced oscillator's pitch produces that tearing, vowel-like
sweep instead of a pitch change. Frequency modulation at audio rate uses one oscillator to
modulate another's pitch, which gives you bell tones, clangs and metal.
The mixer, noise and external input
The mixer sets how much of each oscillator reaches the filter, and it is the most underrated
control on any monosynth plugin. Balance decides whether a patch is a sub with a little edge or
an edge with a little sub. A noise source in the same mixer gives you breath, wind and the front
of a snare. An external input lets you send a drum loop or a vocal through the synth's filter and
amplifier instead of an oscillator.
Filters
A low-pass filter keeps what is below a corner frequency and sheds what is above it. The rate
of that fall is set by the pole count: each pole is 6 dB per octave, so a 3-pole filter sheds
18 dB every time the frequency doubles and a 4-pole sheds 24 dB. With the corner at
500 Hz, a 4-pole is 24 dB down at 1 kHz and 48 dB down at 2 kHz.
Resonance is a boost at the corner itself, and it is where cheap filters give themselves away.
A narrow peak at the corner is what makes a sweep sound like a sweep rather than a slow fade, and
pushed far enough it dominates everything else in the patch. Our longer piece on
cutoff and resonance covers the tradeoff
in detail.
Two filters instead of one changes the instrument. Run them at different corner frequencies
and the gap between them becomes a tone control of its own. Run them on the left and right sides
and that gap becomes width: the same note, filtered two ways, one per speaker. Check the result
in mono before you commit, because width made
by difference is width that can partly disappear when a club system sums the sides.
Envelopes
An envelope is a shape in time with four numbers. Attack is how long the level takes to reach
the top, decay how long it takes to fall to the sustain level, sustain the level it holds at while
the key is down, release how long it takes to fall to silence after you let go. Two envelopes is
the standard: one for volume, one for the filter.
Attack time is the number that decides whether a patch sounds like an instrument or like a
pad someone forgot to shorten. Under about 5 ms a note has a front edge you feel; at
50 ms it swells; at 500 ms it is a fade-in and the groove has gone. The same applies
to the filter envelope, where a fast attack and a short decay gives you the pluck at the start
of a note. Our piece on transients is the
background.
LFO and modulation busses
An LFO is an oscillator running below hearing, from a fraction of a hertz up to around
20 Hz, whose output moves a control rather than making a sound. Aimed at pitch it is
vibrato. Aimed at the filter it is a wobble. Aimed at pulse width it thickens a square. A
sample-and-hold setting picks a new random value on every tick and stays there, which is the
sound of every bubbling sequence ever written.
A modulation bus is a small routing strip: pick a source, pick a destination, set an amount,
and decide what controls the amount. Two busses on one voice is plenty, and having them wired to
the mod wheel and a pedal is what turns a static patch into something you perform. The amount
knob matters more than the source. A vibrato at full depth is seasickness; the same vibrato at
eight percent is a singer.
JOURNEYMAN
is our monosynth: one voice, three oscillators, two ladder filters with a SPACING control between
them, two ADSR envelopes, an LFO with sample and hold, and 200 programs across basses, leads,
keys, pads, percussion and fx. There's a demo on the page.
What separates a good monosynth plugin from a bad one
Eight things, and only two of them appear on a feature list. This is the checklist we use when
a synth arrives, and it is the same one worth running before you spend anything.
Envelope speed at the fast end
Set attack and decay to their minimum, sustain to zero, and play a low note. A good envelope
gives you a click you can use as a percussion hit. A slow one gives you a soft blip no matter what
the numbers say. This single test tells you whether the synth can do plucks, keys and drum sounds,
or only pads.
Resonance that stays playable
Take resonance to three quarters and sweep the cutoff across the full range. Listen for the
peak swamping the rest of the patch, for the level jumping as the peak crosses a strong harmonic,
and for the low end thinning out as resonance rises. A filter you can only use below half
resonance is half a filter.
Glide that tracks the interval
Play a semitone and then an octave with the same glide setting. If both take the same time,
you have constant time. If the octave takes twelve times as long, you have constant rate. Either
is fine; not knowing which one you have is what makes a bass line land in the wrong place.
Tuning you can set precisely
Detune between oscillators has to be settable in cents, not by feel on an unmarked knob. The
difference between 3 cents and 12 cents on a sustained bass note is the difference between a
patch that sits still and a patch that wobbles through the bar.
A second filter, or a reason not to have one
Two filters with a spacing control give you width, a nasal mid-band, or a band-pass you can
play. If a synth has only one, check that it at least offers high-pass as well as low-pass, so
you can clear room under a lead without reaching for an EQ.
Modulation you can reach while playing
The mod wheel and a pedal input are the only two modulators you can operate with your hands
busy. A synth where every program is already wired to the wheel is a synth you will perform; one
where you have to build the routing first is a synth you will program once and then leave alone.
Programs that are starting points
A good factory bank teaches the panel. Load a bass, look at where the oscillators are tuned,
see how far the filter envelope is opening the cutoff, and you have learned something you can
reuse. Sold-as-magic preset packs teach nothing, which is why the count matters far less than
whether the programs are readable.
Formats, CPU and the boring part
Check the formats before anything else. AU matters on Mac, VST3 matters everywhere, and a
standalone build matters if you ever want to play without opening a DAW. Then load eight
instances and watch the meter, because a monosynth is a plug-in you will end up running several
of.
How to test a mono synth plugin in ten minutes
Do this before you buy anything, in your own session, on your own speakers. Ten minutes gets
you further than an hour of reading roundups, this one included.
- Load the synth on a fresh track and open the simplest bass program in the bank.
- Set attack to 0 ms, decay to 0 ms and sustain to maximum, so you hear the raw voice.
- Play A1 at 55 Hz and hold it for four bars.
- Sweep the filter cutoff from fully closed to fully open and back, once, slowly.
- Raise resonance to 75 percent and repeat the sweep.
- Set sustain to 0 and decay to 80 ms, then play sixteenths at 120 BPM.
- Set glide to 120 ms and play a semitone, then an octave, and time both.
- Detune the second oscillator by 3 cents, then by 12 cents, holding a note through each.
- Switch between single and multi trigger while playing an overlapping phrase.
- Bounce eight bars and play it back on a phone speaker and in the car.
Step ten is the one people skip. A phone speaker gives you almost nothing under 500 Hz,
so a bass patch that reads as enormous on monitors can vanish entirely, and the fix is upper
harmonics rather than more sub. Our guide on
bass on phone speakers
works through the arithmetic.
Six patches worth building by hand
Every one of these starts from an initialized voice rather than a program, because building
them is how the panel stops being a picture. The control names below are JOURNEYMAN's; the shapes
transfer to any monosynth plugin with the same parts.
Sub bass that survives the car
One oscillator, triangle, an octave down. Second oscillator at the same pitch on a saw, mixed
about 20 dB under the first, purely for the harmonics a small speaker can reproduce. Cutoff
around 400 Hz, resonance at zero, volume envelope with a 2 ms attack and full sustain.
The saw is doing the work on the phone even though you can barely hear it on monitors.
Rubber funk bass
Two oscillators, square and saw, three cents apart. Filter envelope with a 0 ms attack,
a 90 ms decay and zero sustain, opening the cutoff by roughly an octave and a half. Glide at
60 ms, low-note priority, single trigger, and then write the line with a few overlaps so the
glide has somewhere to go. The pluck comes from the decay, and the slide comes from the overlaps.
Lead that cuts a dense beat
Three oscillators: one at pitch, one an octave up, one a fifth up, all saws. Cutoff high,
resonance around 30 percent, filter envelope shallow. Then open the spacing between the two
filters so the second sits well above the first, which gives the lead a fixed nasal band that
survives everything else in the arrangement. If it still hides behind the drums, the next move is
thickening the synth rather than
turning it up.
Keys under a dusty loop
Square wave on its own, filter around 1.2 kHz, no resonance. Volume envelope with a
4 ms attack, a 600 ms decay, sustain at about 30 percent, release around 250 ms.
Play it with two fingers and let the glide off entirely. This is the sound that sits under a
loop with a real drummer's timing
without fighting it.
Percussion from one oscillator
Noise only in the mixer, both envelopes at zero attack, zero sustain, decay around
40 ms. Cutoff high for a hat, mid with resonance up for a rimshot. Then swap the noise for
a triangle at a low pitch, put the filter envelope's decay at 25 ms and the pitch modulation
at a large amount, and you have a kick. Layer it under the ones you already have and see
what it adds.
An FX sweep with an end
Noise plus a detuned saw, cutoff low, resonance at 80 percent, LFO on the cutoff at a bar-long
rate. Set the volume envelope release to 1.5 seconds so the sweep has a tail rather than a cut.
Print it, reverse it, and put the reversed copy in front of the downbeat it was built for.
Where the monosynth sits in the mix
A monosynth line and a kick drum want the same 60 to 120 Hz, and the loser is decided
before you reach for an EQ. Sidechaining the synth to the kick is the usual answer, and it works
better on a monosynth than on a pad because one voice ducking is one thing ducking. Our piece on
sidechain compression is the method.
Level matters before tone. A synth patch can arrive 12 dB hotter than the sample it sits
on, and everything downstream then reads as wrong when the real problem is the fader. Set the
input level first; gain staging is the unglamorous
half of every synth sound.
Then saturation, and only a little. A bass line with a few added harmonics stays audible on a
laptop speaker where the fundamental never arrives at all, and
a small amount of drive does that job more
cleanly than boosting 800 Hz. Drive after the filter, not before, unless you want the filter
to tame what the drive adds.
The monosynth plugins people name, and ours
Everything in this section was read on the maker's own page while writing. Where no price
appears, the maker does not publish one beside the product, and the shop is a better source than
a roundup. Ours is first because it is the one we would put on the bass. The rest are the names
you will meet everywhere else when you go looking for the best monosynth plugin, and every one of
them does something real.
Gazillion Industries JOURNEYMAN
JOURNEYMAN
is $59. One voice, three oscillators, each with OCTAVE and a continuous WAVE sweep that travels
from triangle through saw and square to pulse, plus 1-2 SYNC and 3-1 FM. A MIXER balances OSC 1,
2 and 3 with NOISE and EXT IN. Two ladder filters share CUTOFF, with SPACING setting the distance
between them, plus RESONANCE and KB AMT, switchable between DUAL LP and HP:LP, and selectable 3
or 4 pole. A FILTER ENV and a VOLUME ENV, both ADSR. An LFO with RATE and SYNC. Two modulation
busses, MOD WHEEL and PEDAL/ON, each with SOURCE, SHAPING, DESTINATION and AMOUNT. GLIDE, keyboard
TRIGGER modes, BEND range, and a TOUCH SURFACE mapping X to cutoff and Y to spacing. 200 programs
across basses, leads, keys, pads, percussion and fx. AU, VST3 and standalone on macOS, VST3 on
Windows, and the demos are on the page.
u-he Repro-1
Repro is listed at 149 € and is one purchase covering two synths, Repro-1 and
Repro-5. u-he describe Repro-1 as proudly monophonic, with two multi-wave oscillators, a 4-pole
resonant low-pass filter, three modulation sources controlling five destinations, a host-syncable
LFO with three waveforms, an arpeggiator with latch, and a twin 32-step sequencer that chains to
64. The page lists over 500 factory presets and built-in effects, and a macOS demo is offered,
with Windows and Linux also available.
Native Instruments Monark
Monark is $99 and runs inside REAKTOR or the free REAKTOR Player rather than as a standalone
plug-in, which is the first thing to check before buying. Native Instruments describe it as a
monophonic synthesizer with three oscillators, a filter and amp section, and fine tuning,
modulation and glide controls, built in REAKTOR Core using zero-delay feedback. The page says
download is available immediately.
Arturia Mini V
Mini V is listed at 149 €. Arturia describe it as a lead and bass instrument with
three oscillators and a ladder filter, adjustable polyphony, effects and modulation options
added on top. A free demo is offered from the product page. Worth hearing before you settle on
what you actually want from one voice.
u-he Diva
Diva is 179 € and is polyphonic rather than a monosynth, which is why it belongs
here as context. u-he list five oscillator models and five filter models drawn from different
classic instruments, mix-and-match panels, three envelope models, two host-syncable LFOs, an
arpeggiator, a resizable interface from 70 to 200 percent, and over 1200 factory presets. If you
want one synth for everything, this is the kind of thing people mean.
Madrona Labs Aalto
Aalto is $99 and is semi-modular, with a patchable interface where you drag connections
between modules rather than choosing from a routing menu. Madrona Labs note that the plug-in runs
in demo mode until registered, which plays a reminder sound about once a minute and disables
saving patches. One purchase covers Mac and Windows; the installers listed are VST and AU for
macOS and VST for Windows.
u-he Bazille
Bazille is 129 € and is a modular system rather than a monosynth, up to 16 voices,
built on four phase-distortion oscillators with FM, four self-oscillating multimode filters, four
ADSR envelopes with a fall and rise option on the sustain stage, two LFOs and a per-voice
morphing sequence. It is the
answer when the question is patching, and the wrong answer when the question is a bass line you
need finished tonight.
Free monosynth plugins worth the download
Two free synths are genuinely worth having, and both are polyphonic instruments you hold to a
single voice rather than monosynths by design. That distinction costs you glide behavior and note
priority, which is exactly the part a monosynth is for, but neither costs anything to try.
Surge XT
Surge XT is free and open source under GPL3, distributed as VST3, AU and CLAP, and the FAQ is
explicit that anything you make with it is yours with no further license. Each patch runs two
scenes, which are two complete synthesis engines you can layer or split, and the factory content
the page lists runs to over 2800 patches and over 700 wavetables. At zero cost it is a great
deal of synth, and it is still a polyphonic engine you are holding down to one note.
Odin 2
Odin 2 is free and open source, a 24-voice synth offered for Windows, macOS and Linux in VST3,
AU, CLAP and LV2 depending on platform. The maker describes analog waveforms, custom drawable
waveforms, several filter designs and five onboard effects. Set the voice count to one and it
will play a line, though the note handling built around that is not what the instrument was
designed for.
We make one free plug-in and it is DRUGS, a one-knob bus compressor for drums, which does not
answer a synth question. Our synth is
JOURNEYMAN
at $59, and the demos are on the page. If your budget is genuinely zero this month, the two above
are the honest answer, and our roundup of
free plug-ins worth installing covers the
rest of a starter chain.
What a monosynth costs you
Every instrument has a bill. This one arrives in four parts and all four are worth knowing
before you spend.
It costs chords. One voice means one note, so pads, stabs and anything harmonic needs a second
instrument or a second instance. Producers who work mainly in chords tend to find a monosynth
frustrating for about a week, and then keep it for the bass.
It costs arrangement space. A monosynth line is loud, narrow and insistent by nature, and two
of them in the same register will fight for the whole record. Give each one a filter setting that
puts it somewhere the other is not, and check the result in mono, where
phase problems between two similar parts show
up first.
It costs setup time. Programs get you started, but the difference between a good monosynth
line and a generic one is almost always five minutes spent on envelope times and glide, and there
is no preset for the tempo of your song.
It costs low end discipline. A single voice at 41 Hz with the filter open carries real
energy, and your limiter will find it. Watch the meters while you write rather than after, and
read our piece on headroom if the master is
getting quieter every time the bass plays.
Four mistakes worth not making
These come up in the same order every time, and all four are cheaper to avoid than to fix.
Writing the line before setting the envelope. The groove of a monosynth part
lives in decay time, not in the notes. Set decay and sustain first on a single repeated note,
get it feeling right against the drums, and then write the melody into a shape you already like.
Using detune as a substitute for arrangement. Piling on detuned oscillators
makes a patch wider and less certain about its own pitch, which is the exact failure in the opening
paragraph. Take detune to zero, make the part work, then add back the smallest amount that does
something.
Leaving glide on for everything. Glide is a gesture and gestures need
spacing. A bass line where every note slides reads as seasick after eight bars. Put glide on the
two notes that deserve it by overlapping only those, and leave the rest stepping.
Judging the patch inside the loop. A monosynth sound that is perfect on repeat
is usually too bright and too long across three minutes. Print it, play the whole arrangement, and
take a third of the filter envelope away. The version that feels slightly under-done in the loop
is the one that survives the record.
Questions people ask
What is the best monosynth VST?
The one whose envelopes are fast enough for a percussive attack, whose filter stays usable with
resonance high, and whose glide you can predict. Those three decide how it behaves on real
material; oscillator count and preset totals decide almost nothing. JOURNEYMAN is $59 and carries
all three, with three oscillators, two ladder filters with a spacing control, and 200 programs.
Test any candidate with the ten steps above before you spend.
What is the best mono synth VST for bass?
One with low-note priority, constant-rate glide and a filter that keeps its low end when
resonance rises. Bass is where note priority stops being trivia: hold a root and play a passing
note above it, and low-note priority keeps the root while high-note priority jumps. Set the
cutoff around 400 Hz with a second oscillator adding harmonics above, then check the result
on a phone before you decide it works.
What is the best free monosynth plugin?
Surge XT, with Odin 2 close behind. Both are free and open source, both run as VST3 on Windows
and Mac with AU on Mac, and both are polyphonic engines you hold to one voice. What you give up
is the glide and note-priority behavior that a monosynth is built around, which is a real loss on
bass and barely noticeable on a lead.
Is a mono synth plugin worth it when my synth already has a mono mode?
Sometimes. A mono mode on a polysynth usually gives you one voice and a glide control and
stops there. A monosynth plugin gives you note priority, single and multi trigger, and a panel
laid out for a single line, which means you reach the control you want without opening a menu.
If you only need a one-voice pad, the mono switch is fine.
How many oscillators does a monosynth actually need?
Two will make almost every sound; three makes them faster. One oscillator plus noise covers
percussion and clean sub. Two lets you detune, or stack an octave. The third is for the fifth on
a lead, for a sub octave under a detuned pair, or as an FM source aimed at one of the others.
Past three you are usually solving an arrangement problem with a synth control.
Why does my monosynth sound thin next to a polysynth?
Because a chord has three or four notes of energy and a line has one. The fix is not more
detune. Add an octave below in the mixer, open the filter another few hundred hertz, and add a
small amount of saturation so the harmonics fill the space that the missing notes were filling.
Then check it against the drums rather than solo.
Do I need a MIDI keyboard to use a monosynth plugin?
No, but glide and trigger modes are hard to set by drawing notes, because both depend on how
much two notes overlap. You can do it in the piano roll by dragging note ends past the next note
start. A keyboard makes it five minutes instead of thirty, and any two-octave controller is
enough for a bass line.
Can a monosynth plugin make drums?
Yes, and it is the fastest way to a kick that belongs to your track rather than to a pack.
Triangle oscillator, pitch modulation with a very short decay, volume envelope at zero attack and
around 40 ms decay. Layer it under an existing sample so the sample keeps the character and
the synth supplies the weight.
What JOURNEYMAN does
JOURNEYMAN
is a monosynth for Mac and Windows, $59, in AU, VST3 and standalone on macOS and VST3 on Windows.
Three oscillators, each with an OCTAVE switch and a WAVE control that sweeps
continuously from triangle through saw and square to pulse. 1-2 SYNC locks the
second oscillator to the first; 3-1 FM points the third at the first.
The MIXER balances OSC 1, 2 and 3 alongside NOISE and
EXT IN, so a drum loop or a vocal can take the oscillators' place and run
through everything downstream. Two ladder filters follow, sharing one
CUTOFF, with SPACING setting how far apart they sit,
RESONANCE and KB AMT for keyboard tracking. They switch between
DUAL LP and HP:LP, and between 3 and 4 pole.
FILTER ENV and VOLUME ENV are both ADSR. The
LFO has RATE and SYNC and includes sample and hold. Two modulation busses,
MOD WHEEL and PEDAL/ON, each take a SOURCE, a SHAPING curve, a
DESTINATION and an AMOUNT, so the wheel under your left hand is doing something on every program.
GLIDE, note priority, and keyboard TRIGGER modes with a
BEND range handle how the single voice responds to playing.
The TOUCH SURFACE maps X to cutoff and Y to spacing, which means one gesture
moves the brightness and the width of the voice at the same time. 200 programs
cover basses, leads, keys, pads, percussion and fx, and every one of them is wired to the mod
wheel and the touch surface before you touch anything.
Same line, same four bars, one voice this time. Now it arrives in the car.
JOURNEYMAN — a monosynth for Mac and Windows. One voice, three oscillators,
two ladder filters, two envelopes, two modulation busses and 200 programs.
Hear it
Keep reading
- How to make a synth sound thicker — Unison, oscillators, a mono sub, chorus, saturation and layering, without the harshness.
- Filter cutoff and resonance explained — The corner frequency, the slope, the resonant peak, and what each costs.
- Best detune plugins — Cents, beating and mono: how to pick a detune plugin, free or paid.
- How to make bass audible on phone speakers — Harmonics, a mid-bass layer, EQ that helps, and testing on a real phone.
- Sidechain compression — Ducking one track with another: routing, settings, and when not to.
- Ladder filter explained — What a ladder filter is, and the low end resonance takes away.
- Monosynth vs polysynth — What one voice buys you, and how to hear paraphonic against polyphonic.
- Best synth VST for hip hop — The three jobs a hip hop synth has to do, and the controls in order.
- Best polysynth VST — What voice count really changes, and how to audition one fast.
- Best arpeggiator VST — Why a MIDI arp and a built-in arp are different tools.