← Gazillion Industries/Reading material
Best filter plugins
Gazillion Industries ·
Someone asks which filter plugin is the best, and forty replies later
there are thirty names and no method. The knob is the same knob on every one of them. What
separates them is what happens in the second while it moves.
Judge a filter on three things, in this order: how it behaves when you modulate it fast,
whether resonance stays musical when you push it, and whether it can be driven. A clean static
filter is a tone control you already own inside your EQ. The money buys movement and drive. Ours
is F(ilter)12,
$49 for Mac and Windows: one cutoff that drives harder the further it travels, five shapes, a
slope knob, and a lo-fi section in front. The rest of this page is how to check that, plus the
other names worth knowing.
The short version
- The job
- remove or emphasize a band, and move that decision over time
- Judge it
- moving, at speed, in a mix — never sitting still in solo
- Surgical
- clean sweeps, precise slopes, sweeps you should not hear working
- Character
- drive in the path, nonlinear resonance, grain on the way past
- Modulation
- drawable shapes, envelope followers, per-band control
- Our answer
- F(ilter)12, $49, Mac and Windows, the character end,
with DRUGS free in the box
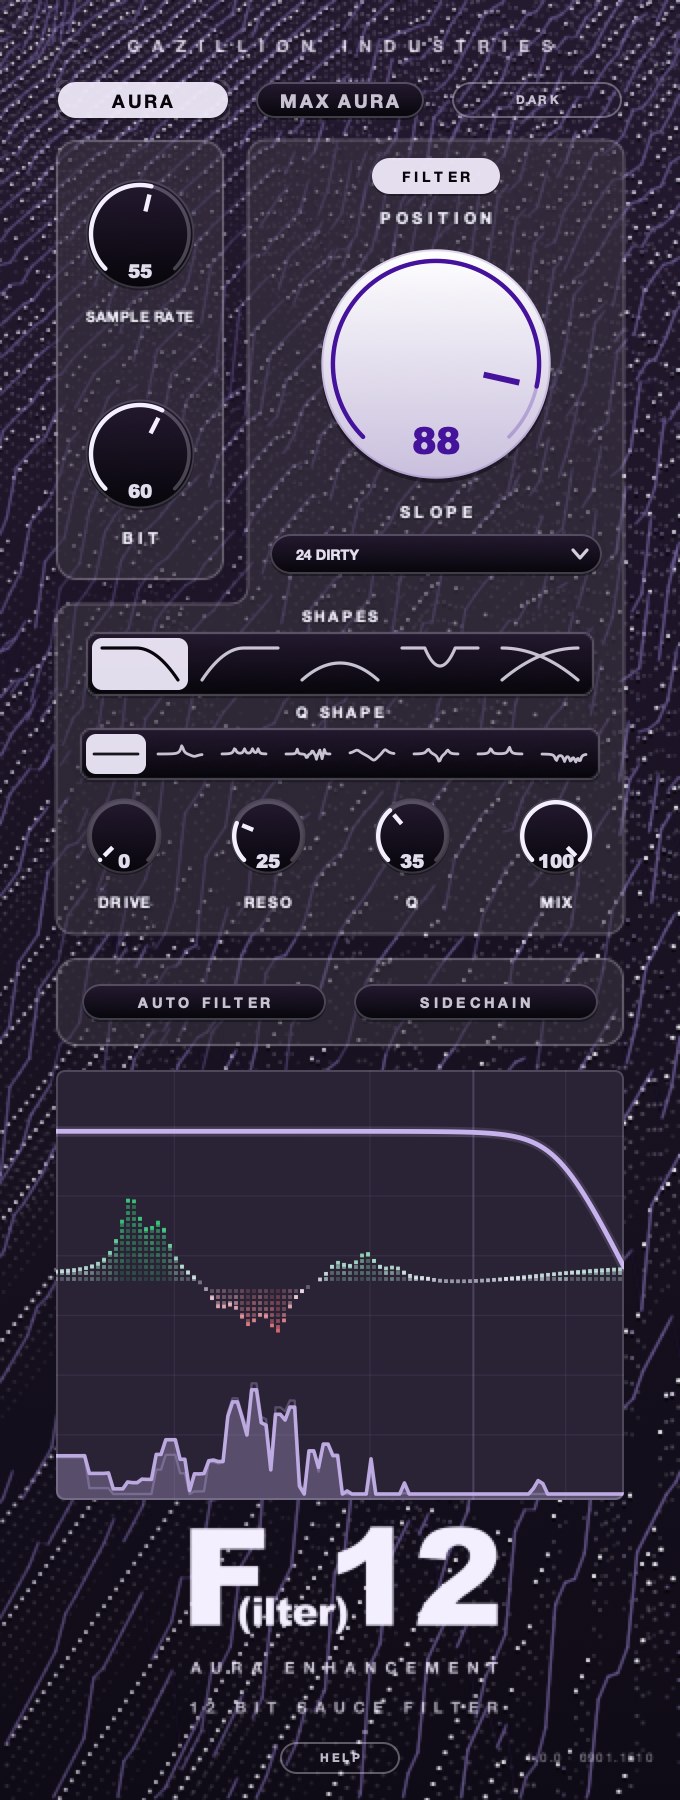 One filter, one lo-fi section, one correction. The green and red pixels in the
display are AURA showing where it is adding and where it is taking away.
One filter, one lo-fi section, one correction. The green and red pixels in the
display are AURA showing where it is adding and where it is taking away.
So which filter plugin do you actually use?
Three different products share this category, and picking the wrong one accounts for most of
the disappointment in it. A surgical filter gives you clean sweeps and precise
slopes and adds nothing on the way through. A character filter puts drive in the
path, so pushing it does something other than raise the level. A modulation engine
is a shape editor with a filter attached to it. Decide which of the three you are buying before
you read a single recommendation, including this one.
Ours is the character one.
F(ilter)12 is
$49 for Mac and Windows, and the whole panel points at that second job. POSITION sets where in the
spectrum the filter sits, and the further it works the more it drives and the more it sings, built
into the travel rather than dialed in beside it. SLOPE is a knob from 18 dB per octave up to a
wall where almost nothing gets past. DIRTY feeds the filter's own distortion back through itself,
and switched off the same filter runs clean. In front of all of it sits a lo-fi section, SAMPLE
RATE and BIT, which is the part no clean filter has. DRUGS, our one-knob bus compressor for drums,
comes in the box.
Where ours is the wrong answer, briefly. If you need three filters running on three separate
frequency bands as a rhythm part, that is Cableguys FilterShaper Core. If you need a drag-and-drop
modulation matrix feeding a dozen destinations at once, that is FabFilter Volcano 3. Both are
described further down with their makers' own specs, and neither of them is a filter with a
crusher in front of it. For everything between, the six tests below settle it without taking
anybody's word, ours included.
What a filter plugin actually is
A filter removes content above or below a corner frequency, at a rate set by its slope, with
an optional feedback peak sitting right at that corner. Cutoff decides where the corner is.
Slope decides how fast the removal happens past it, in dB per octave. Resonance decides how
loudly the filter announces the corner, and at high enough settings it will ring on its own with
no input at all. That is the whole mechanism, and it has not changed since the first voltage
controlled filter.
The reason there are hundreds of filter plugins and only one mechanism is that the
mechanism is easy and the details are not. Two filters set to the same cutoff and the same slope
can measure within a decibel of each other on a sine sweep and sound nothing alike on a
breakbeat, because one of them distorts as level climbs, one of them steps when you automate it,
and one of them folds new content back down into the audible range when you push it. The
background on corner, slope and Q is in
filter cutoff and resonance, and the
rest of this page is about the parts that only show up in use.
Filter or EQ: which one you actually want
An EQ band and a filter are the same math with different manners. A parametric EQ is built
to be set and left, with wide ranges, flat phase options and a display that tells the truth about
a static curve. A filter is built to be moved, with a cutoff range mapped so the useful part
sits under your hand, slopes steep enough to be an event, and resonance you are supposed to
push.
The practical test is whether the setting is a decision or a gesture. Rolling 40 Hz of
rumble off a vocal is a decision, and it belongs in the EQ where it will sit still and never
surprise you. Opening a pad over eight bars is a gesture, and a good filter will make that eight
bars interesting where an EQ band automated across the same range will just get quieter and
brighter in a straight line. Most of the disappointment people report with filter plugins comes
from buying a gesture tool for a decision job. One cutoff you can grab, drive and shape is worth
four EQ bands you have to automate in parallel, and that is the whole argument for owning a
filter at all.
What separates the good ones
Six things, and only one of them shows up in a screenshot. Our own plug-in is the worked
example for each, because we would rather describe what a panel does than adjective it.
1. It does not step when you automate it
A filter's coefficients are recalculated every time the cutoff changes. If a plugin
recalculates once per audio block rather than smoothing between blocks, a fast sweep arrives as a
staircase, and you hear it as a fine grinding or a series of clicks under the sweep. At a 512
sample buffer and 44.1 kHz that is 86 updates a second, which is coarse enough to be audible on a
half-bar sweep and obvious on a sixteenth-note wobble. Makers who have solved this tend to say so
in the feature list, usually as parameter smoothing or sample-accurate automation. The ones who
have not, do not mention it. Rather than add our own sentence to that pile: run step three of the
ten-minute test below on
F(ilter)12 and
on anything else you are weighing, with the same loop, at the same tempo. A sixteenth-note sweep
tells you in four seconds what a feature list takes a paragraph to imply.
2. Resonance stays stable when pushed
Resonance is feedback, and feedback around a filter that is also being modulated is a
well-known way to make a loud noise you did not ask for. Good designs either constrain the
feedback so the loop stays bounded however fast the cutoff moves, or they give you the choice.
On F(ilter)12 the choice is split across two knobs and a switch: RESO sets how much resonance,
Q sets how narrow, and DIRTY decides whether the filter's own distortion comes back around or
stays out of it, so the peak can be a thickening or a spike depending on which way you want it.
Cableguys ships a different answer to the same problem on FilterShaper Core: a Safe Res mode that
holds resonance to stable levels, which you can switch off when you want the filter to
self-oscillate.
3. There is drive somewhere in the path
The single largest audible difference between a filter that people describe as warm and one
they describe as sterile is nonlinearity. A hardware filter saturates in two places: at the input
stage and inside the resonance path. Saturation in the resonance path is the one that matters,
because it limits the peak as it grows, which is why a pushed hardware filter gets thicker
instead of simply louder.
This is the reason F(ilter)12 exists in the shape it does. POSITION drives harder the further
it works, so the drive is a consequence of where you put the filter rather than a separate knob
you remember to turn up, and DRIVE and DIRTY sit behind it for when you want more of it or none
of it. Nothing in it was measured from hardware and it models no specific device; what it has is
the behavior, which is the part you can hear. Two other makers describe their own version of the
same design decision in their own words: FabFilter says Volcano 3's filter styles offer saturation
and self-oscillation at high peak settings, and Cableguys describes adjustable resonance
distortion inside the resonance circuit on its warm filter types.
4. It has more than one slope
A single 24 dB per octave low-pass will do most jobs and will be wrong for a few. Gentle
slopes shade a sound and leave the character above the corner partly intact; steep slopes make
the filter an event and take everything. Most filters give you a switch with two or three
positions on it. Simplon, FabFilter's smaller filter, gives 12, 24 and 48 dB per octave across
low-pass, high-pass and band-pass, which is a reasonable minimum to ask for. F(ilter)12 makes
SLOPE a knob instead, from 18 dB per octave up to a wall where almost nothing gets past, so the
steepness is automatable and you can find the exact point where a loop goes from shaded to gone.
The honest limit at our end: 18 is where ours starts, and below 12 dB per octave a one-pole filter
is a tilt rather than a cut, which is genuinely useful for taming a bright sample without
hollowing it. Reach for a shelf in your EQ for that one.
5. The modulation can be shaped, not just switched on
Every filter plugin has an LFO. The useful ones let you draw the shape, sync it to the grid,
offset its phase, and trigger it from something other than the clock. The difference between a
sine LFO on the cutoff and a drawn shape with a fast attack and a slow tail is the difference
between a wobble and a groove. On ours it comes two ways, one at a time: AUTO FILTER hands the
cutoff to a clock, with a shape, a division, a grid, SWING to push it off that grid and PHASE for
where in the shape each cycle starts; SIDECHAIN hands it to a signal instead, with what it
follows, what it hears, which way it travels, how far, and how eagerly it makes up its mind.
Engaging either releases the other, on purpose, because two things driving one cutoff means
neither knob does what it says. The mechanics of the clock-driven kind are in
the auto filter roundup.
6. It tells you what it is doing
A filter display that shows the curve and the actual spectrum behind it saves more time than
any preset bank. You want to see where the corner sits against the material, not against a
drawing of the material. On F(ilter)12 the heavy line is the filter, behind it is what is going in
and what is coming out, and the field of pixels is AURA drawn honestly: green where it is adding,
red where it is taking away, nothing where it has no opinion. This is a small thing that becomes a
large thing at two in the morning.
The aliasing question, briefly
Any nonlinearity generates harmonics above the ones present in the source. If those
harmonics land above half the sample rate, they fold back down into the audible band as
inharmonic content, and on a resonant filter being driven hard that arrives as a metallic ring
that tracks the cutoff in the wrong direction. Oversampling is the fix: run the nonlinear stage
at two or four times the session rate, filter, and come back down. The cost is CPU and a little
latency. The full picture is in
what aliasing is, and the trade is laid
out in oversampling.
Worth saying plainly: aliasing is not automatically a defect. A deliberate lo-fi filter wants
some of it, and several much-loved sounds are mostly fold-back. What you do not want is a plugin
that aliases when you asked for clean, with no way to turn it off. F(ilter)12 puts that decision
on a knob rather than leaving it to chance: SAMPLE RATE in the CRUSH PAIR slows the rate the audio
is sampled at, so the top goes and what was up there folds back down as new content, on purpose,
by as much as you ask for. Set it to the top and the crusher is out of the way. The background is
in bitcrushing explained.
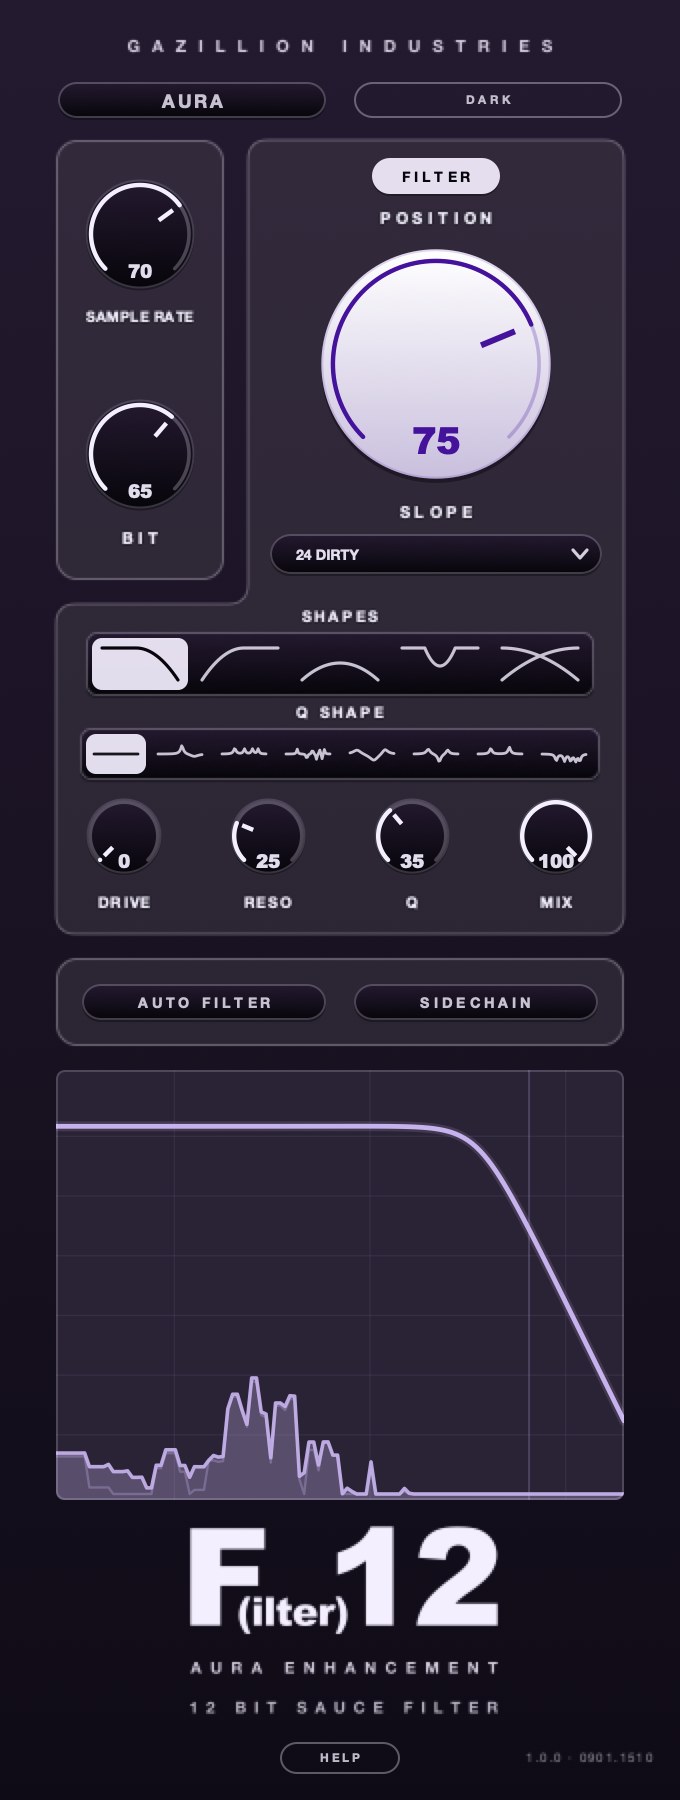 The same panel with AURA off. Curve on top, what went in and what came out
behind it. Look at the material, not at a drawing of it.
The same panel with AURA off. Curve on top, what went in and what came out
behind it. Look at the material, not at a drawing of it.
How to test a filter plugin in ten minutes
Demos are free and opinions are cheap, so test rather than read. Use one loop you know
completely and run every candidate through the same eight steps, ours included and ours first, so
you have something to measure the rest against. Anything that fails step three can go back.
- Load a drum loop with content from 50 Hz to 15 kHz and set the plugin to low-pass at 24 dB
per octave.
- Sweep the cutoff by hand from fully open to 200 Hz over two bars and listen for stepping or
clicking under the sweep.
- Repeat the sweep over one sixteenth note. A filter that survives that survives everything
you will do to it.
- Set resonance to maximum and sweep again. Note whether the peak stays level or climbs into
a squeal.
- Turn resonance down to zero, set cutoff at 1 kHz, and match loudness against bypass before
you form an opinion about the sound.
- Push the input drive, if there is one, until the meter reads 6 dB hotter and listen for the
peak thickening rather than only rising.
- Switch to high-pass and sweep up to 2 kHz on a bass part, listening for phase artifacts as
the corner crosses the fundamental.
- Bounce the two best candidates and play both on a phone speaker.
That last step is the one people skip and the one that decides purchases. A resonant peak at
3 kHz is character in headphones and an ice pick on a laptop, and the whole point of a filter is
that it changes what survives the small speaker at the end of the chain.
F(ilter)12
is built for step six. The drive is in how far the cutoff travels rather than bolted on beside it,
the lo-fi section sits in front of the filter, and the whole thing is $49 for Mac and Windows with
DRUGS thrown in. It moves on video on the product page, which is the only honest way to show a
filter.
Where a filter goes in the chain
Position changes the result more than the plugin choice does, and the rules are short.
Before saturation if you want the filter's decision to be permanent. The
saturator generates harmonics from whatever reaches it, so material removed first never comes
back. This is how you get a genuinely dark sound that still has edge, because the edge is being
manufactured below the corner rather than surviving above it.
After saturation if you want the filter to be a performance. The saturator
fills the spectrum, the filter sweeps through a full spectrum, and the sweep has something to
sweep through. On a build, this is almost always the order you want.
Before compression when the filter is removing a problem, so the compressor
stops reacting to it. After compression when the filter is an effect, so the
compressor does not chase the level changes the filter causes. A resonant sweep into a fast
compressor produces ducking that follows the sweep, which sounds like a mistake because it
is one.
Before reverb and delay almost always. Filtering the send rather than the
return is the cleanest way to get a dark, distant tail without dulling the dry signal, and it is
the whole trick behind
making something sound like
it is in another room.
On the bus, not on every channel. Eight instances of the same filter with
slightly different cutoffs will cost you more CPU and more phase coherence than one instance on
the group, and the group version is easier to automate as a single gesture.
One instance saves you a plugin slot as well, if the filter has a crusher in it. Inside
F(ilter)12 the order is fixed and it is the order you want: CRUSH PAIR first, filter second, so
the fold-back the crusher creates gets filtered rather than sitting on top of everything. MIX
blends the whole thing back against the dry signal, which is parallel filtering without a second
bus.
Named options people shortlist
Everything below was read on the maker's own page while writing this, and the facts are
theirs. Prices are stated only where the maker publishes one in plain text beside that product's
own name. Where a maker shows price through a script we could not read, we say nothing about cost,
because a wrong number is worse than no number. None of these is our recommendation — ours
is above, and set out in full at the bottom — but these are the names that come up, and
knowing what each one is actually for saves you a month.
FabFilter Volcano 3
Four filters with flexible routing, including per-channel and mid/side modes. FabFilter says
each filter offers many shapes, that version 3 added vintage-style EQ shapes with internal drive
and nonlinearities — bell, low and high shelf, notch and all-pass — and that the
filter styles give saturation and self-oscillation at high peak settings. Modulation runs on
16-step XLFOs, XY controllers, envelope generators, envelope followers and MIDI sources, assigned
by drag and drop. Version 3 also added a Drive setting per filter and a High Quality option that
enables maximum internal oversampling. The first Volcano shipped in 2005. There is a 30-day
trial.
Who buys it — people who want a modulation workstation that happens to filter, and
who are willing to spend an evening learning a routing grid.
FabFilter Simplon
The stripped version of the same idea: two independent multimode filters with low-pass,
high-pass and band-pass responses at 12, 24 and 48 dB per octave, runnable in series or parallel.
Each filter has three characteristics that set its sound and overdrive, which FabFilter counts as
up to 27 filter types in total. The company says the filters came out of FabFilter One and were
designed to be the fattest and smoothest self-oscillating digital filters they could build. Also
a 30-day trial.
Who buys it — people who want two filters and a big draggable display and nothing
else on screen to think about.
u-he Filterscape
129 € on u-he's own page, which buys a trio of plugins built around a morphing EQ: the
effect version, a Q6 version and a synth version. Two multimode filters with mixable low-pass,
band-pass, high-pass and notch outputs, plus nine additional analog filter options in 2-pole,
3-pole and 4-pole configurations added in version 1.5. The centerpiece is a four-band parametric
EQ with eight morphable snapshots, where each band's frequency and amplitude can be modulated
from a different source per snapshot. Two 16-step host-synced sequencers, two LFOs with eight
waveforms, four envelope followers and a stereo delay sit around it. macOS and Windows, with
Linux builds u-he labels beta. Filterscape was u-he's first cross-platform plugin, published in
2004.
Who buys it — people whose gesture is a whole moving spectrum rather than one
corner frequency: formant-style vowels, evolving shelves, shapes a cutoff cannot describe.
Cableguys FilterShaper Core
39 € on Cableguys' own page. Twenty filter types, zero-delay feedback design with
resonance compensation and internal saturation, and drawable LFO waveforms that lock to beats and
bars with sample-accurate sync. The thing that sets it apart is that it is multiband: three
filters running at once on separate frequency ranges, so a band-pass can bounce on the treble
while a resonant low-pass works the bottom. Envelope followers with adaptive release handle
dynamic filtering, and audio triggering fires patterns from the rhythm of a loop. Safe Res limits
resonance to stable levels and can be switched off. It runs inside ShaperBox 3 alongside the other
Shapers. Free trial.
Who buys it — people writing the filter movement as an arrangement part: house,
techno, bass music, anywhere a drawn cutoff pattern is a hook rather than a transition.
Xfer Records LFO Tool
$49.95 USD, stated in plain text on the Xfer page. It is a modulation tool with a filter
attached rather than the other way round: a point and tension-curve editor, twelve graphs stored
in a preset and switchable by MIDI note or automation, and up to four graphs running at once on
cutoff, resonance and pan. Rate is BPM with optional swing, or free-running in Hz, with
sample-accurate sync, and it can send MIDI CC out to drive other instruments and effects. Mac and
Windows, VST, Audio Unit and AAX. The demo runs 15 minutes at a time.
Who buys it — people who want one drawn shape controlling several parameters in
lock, and who want that shape to leave the plugin and operate something else.
MeldaProduction MFilter
$56 regular price on Melda's own page. Four modulators, with sources including LFOs, audio
level followers, envelope generators, a randomizer and pitch detectors, any of which can be
pointed at any parameter. The display carries an integrated analyzer, a sonogram and spectrum
areas, so you are watching the material rather than a static curve. Melda puts wet and dry audio
examples on the product page across bass, guitar, pad and keys, which is more than almost
anybody in this category does. There is a free trial.
Who buys it — people who want to see everything and modulate everything, and for
whom a dense interface is a feature rather than a tax.
Audio Damage Filterstation 2
$39.00 USD, stated on the product page. Two resonant filters that run in series, in parallel,
or split across the stereo field, with twelve filter algorithms covering low-pass, high-pass,
band-pass and notch, and a different algorithm loadable into each slot. An envelope follower with
a stereo sidechain input drives the cutoff, so a signal can open the filter on another track. An
LFO with twelve patterns handles synced or free movement, a VCA mode turns the filter section
into a tremolo and gate, and an FSU section exists for when clean is beside the point. VST3, AU,
AAX and CLAP on desktop, AUv3 on iPhone and iPad, with macOS, Windows and Linux builds. Audio
Damage states no DRM, no subscription and a perpetual license. The demo is fully functional with
a 20-minute session timer and saving disabled.
Who buys it — people who want two filters arguing with each other, or who need the
sidechain input because one track has to open the filter on another.
Kilohearts Filter
Free with a Kilohearts account. Seven modes — low-pass, band-pass, high-pass, notch, low
shelf, peak and high shelf — with a cutoff knob that Kilohearts documents as the point where
a low-pass reduces the signal by 3 dB, a Q knob, and a gain control for the shelf and peak types.
It works as an ordinary plugin and as a Snapin inside their modular hosts, so the same filter can
be dropped inside a larger chain later. It is part of the free Kilohearts Essentials
collection.
Who buys it — nobody, it is free. Take it as a clean, well-documented reference
point and find out what you actually need.
The best free filter VST options
The free answer is real and it is short. Your DAW ships an auto filter with a resonant
multimode design and some modulation attached, and for a share of the jobs people go shopping for
it is enough. Kilohearts Filter, above, is free with an account and documents each control. Both
are clean filters, and that word is the whole story: they remove, they do not add. No drive in the
travel, no crusher in front, no shapes that ride the cutoff.
Our free one is not a filter, so we will say what it is rather than stretch it.
DRUGS is a
one-knob bus compressor for drums, free for Mac and Windows, and it also arrives in the box with
F(ilter)12. If what you are really chasing is glue on a drum bus rather than a cutoff, take that
and spend nothing.
Then use the trials, which are generous in this category and are the reason nobody needs to
buy on a forum thread's say-so. FabFilter runs 30-day trials on Volcano 3 and Simplon. Melda
offers a free trial of MFilter. Cableguys offers a free trial of FilterShaper Core. Audio
Damage's Filterstation 2 demo is fully functional with a 20-minute session timer and saving
turned off. Xfer's LFO Tool demo runs 15 minutes at a stretch. Four evenings of that will teach
you more than four hundred comments, and it will also tell you precisely what the free ones cannot
do, which is the only shopping list worth having.
What people mean by the best analog filter plugin
Nobody searching that phrase wants a measurement. They want three behaviors that most digital
filters historically did not have, and the phrase is shorthand for all three at once.
The first is level-dependent response. A filter whose character changes with input level
rewards playing, because hitting it harder does something other than making it louder. The second
is saturation in the resonance path, which is what stops a resonant peak from turning into a
squeal and turns it into a thickening instead. The third is imperfection in the corner: a curve
that is not a textbook slope, with a small amount of ripple or droop that keeps the filter from
sounding like a line drawn on a graph.
F(ilter)12 is our answer to that search, and the honest framing matters here: nothing in it was
measured from hardware and it models no specific device. What it has is the behavior. POSITION
drives harder the further it works, which is the first of the three by design. DIRTY feeds the
filter's own distortion back through itself and switches off for a clean run, which puts the
second under your control rather than baked in. Q SHAPE puts peaks and dips at fixed distances
from wherever the filter is, so the curve is never a textbook slope unless you pick PLAIN. That is
the third, on a selector.
Several other makers state plainly in their feature lists that they have done the same work.
Read those lists for nonlinearity, drive, zero-delay feedback and self-oscillation, and treat the
word on its own as a flavor description rather than a specification. Then do the drive test in
step six above, because that test resolves the argument in about forty seconds and it does not
care whose plugin it is.
Best creative filter plugin: what creative buys you
The creative end of this category sells movement, and movement comes in three grades.
Grade one is an LFO with shapes. Useful, present everywhere, and the least interesting reason
to spend money. Grade two is a shape with grid sync, phase offset and swing, which is a
different instrument entirely, because a cutoff pattern is rhythm and sits in the
arrangement the way a hi-hat pattern does. Grade three is a filter driven by something other than
a clock: an envelope follower on the track itself, a sidechain from another track, or a MIDI note
that retriggers the shape. Auto-wah lives in grade three, and so does every filter that appears
to be listening to the music. The mechanics of the clock-driven version are in
the auto filter effect, and the hand-played
version is in how to make a filter
sweep.
F(ilter)12 covers grades two and three: AUTO FILTER for the clock, with SWING and PHASE, and
SIDECHAIN for the signal. It also carries the one thing the grade system does not describe, which
is a resonant shape that travels. Q SHAPE holds peaks and dips at fixed distances from the cutoff,
so a VOWEL or a COMB moves with the knob instead of sitting still under it, and DRAW lets you
place those points yourself. A sweep through four peaks spaced like a voice is not something an
LFO on a plain low-pass can reach.
Two honest caveats, one general and one ours. The general one: grade three costs more setup and
delivers more on material with dynamics, so on a fully compressed loop an envelope follower has
almost nothing to follow and you will draw the shape by hand anyway. Ours: AUTO FILTER and
SIDECHAIN run one at a time, by design, and it is one band rather than three. If the arrangement
needs three filters moving on three separate bands, that is a multiband tool and Cableguys makes
one.
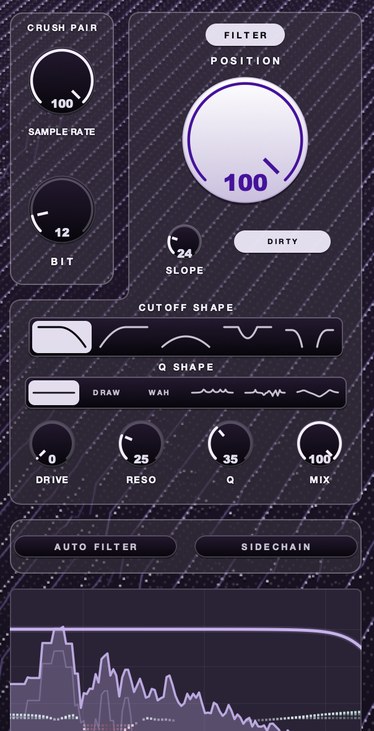 12 bit, full rate. Quantization without losing the top.
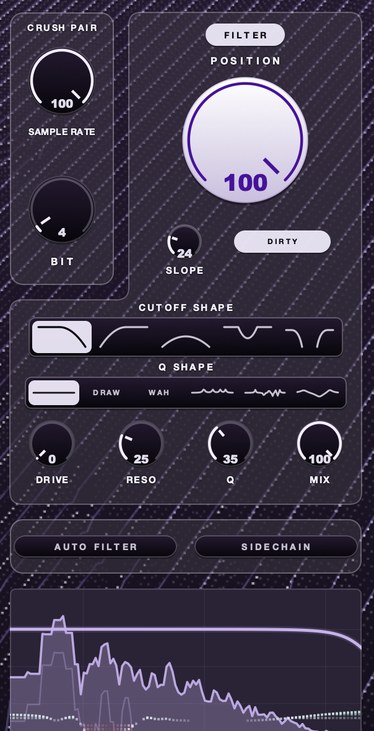 4 bit at 8 kHz. Bits make it grainy, the rate makes it clang.
Filters by source: drums, bass, vocals, samples
The category advice above is general. What you put it on narrows it further.
Drums. A low-pass with a shallow slope and no resonance is the fastest way to
push a loop behind the vocal without losing the hit, because the transient survives a shallow
slope better than it survives a steep one. Steep filters on drums remove the attack along with
the air, and the loop goes soft in a way no amount of compression brings back. On F(ilter)12 that
is SLOPE at the bottom of its range with RESO at zero, and then a little BIT if you want the loop
dusty rather than only distant; the rest of that job is in
making drums sound dusty.
Bass. High-pass with care and low-pass with confidence. A high-pass sweeping
up through the fundamental rotates phase around the note, and on layered bass the layers stop
agreeing with each other before you hear anything obviously wrong. Check in mono. A low-pass on
the top of a bass part, on the other hand, is free: it removes the fizz that was fighting the
hi-hats and nothing in the low end notices. The slope choices for both are in
low-pass and high-pass
plugins.
Vocals. Filters on vocals are usually band-pass effects rather than tone
decisions, and the band-pass version has a name everybody already knows — the whole recipe
is in the telephone effect on
vocals. For corrective work on a lead, use the EQ. For a distant double or a pre-chorus
drop-out, use the filter and automate it. Our band-pass is one of the five CUTOFF SHAPES, with Q
setting how narrow the window gets.
Samples. This is where character filters earn their money, because a sample
arrives already finished and the filter is how you take it apart. A resonant low-pass with drive
will move a loop from somebody else's record to yours faster than any other single process, and
the sweep can be played by hand rather than drawn. This is the job F(ilter)12 was built around:
crush first, filter second, POSITION driving harder as it travels. If the sample needs to sound
older rather than darker, the bit-depth side of it is covered in
12 bit sampler plugins.
Hear it
Most writing about this category describes a sound and never plays one. The filter has to
be heard moving, so that one is on video on the product page. Here is the lo-fi section that
sits in front of it, on the same loop, rendered offline.
Dry — no processing
BIT down — coarser steps, the grain arrives
SAMPLE RATE down — the top goes and folds back
Both — the pair working together
The same loop each time, rendered through
F(ilter)12.
No other processing, no master bus, no edits. The filter itself moves, so it is on video on the
product page rather than frozen here. None of the plugins named above has a bit and rate
crusher ahead of its filter, so none of them has this to play you.
Best filter VST in 2025 and 2026: what actually changed
Not much, and that is the useful answer. The filter designs that people call good were mostly
settled years ago, and the last several years of releases have moved the work into three places:
modulation drawing, multiband operation, and cheaper oversampling, because CPUs got fast enough
that running a nonlinear stage at four times the session rate stopped being a decision.
What this means for a purchase in 2026 is that a filter released in 2005 and kept updated is
not automatically behind one released last month. Volcano's first release was 2005 and
Filterscape's was 2004; both are on current versions with current feature sets. Check the version
history rather than the release date, and check whether the maker has shipped a paid upgrade
recently, because that is the honest signal that somebody is still working on it. Ours is on
version 2.0, which added a drawable Q SHAPE, turned SLOPE from a switch into a knob, gave DIRTY
its own switch and added whole-plug-in bypass.
The one thing worth holding out for on a new purchase is format coverage. CLAP support, Apple
Silicon builds and AUv3 for iPad have all arrived unevenly, and a plugin that cannot load in the
host you will be using in two years is a bad deal at any price. F(ilter)12 installs as an Audio
Unit, a VST3 and a standalone application on macOS 10.13 or later, as a universal binary for both
Apple Silicon and Intel, and as a VST3 on Windows 10 or later, 64-bit. Zero samples of latency, at
whatever rate your session runs, and no internet connection needed after activation.
A buying order that works
- Write down the two things your stock filter will not do. That list is the purchase, and
nothing else is.
- If both of them are drive and character, stop shopping and demo
F(ilter)12,
because that is the job it was built for and it is $49.
- If either of them is multiband rhythm or a large modulation matrix, take the relevant trial
from the list above instead.
- Run the ten-minute test on your own loop, at your own tempo, not on the demo preset.
- Match loudness against bypass before deciding anything about the sound.
- Play the bounce on a phone speaker.
- Buy one. Do not buy two, and do not buy a bundle to get one.
What it costs you
Resonance is boost, and every dB of peak is level you give back somewhere else. A resonant
filter in front of a limiter will push it around in ways that have nothing to do with the
arrangement, and the meter will read hotter while the mix reads thinner. Match loudness before
you judge, every time. This applies to ours as squarely as to anybody's: POSITION driving harder
as it travels means the output moves while you sweep, and MIX is the fastest way to give that
level back.
Steep slopes cost phase. A 48 dB per octave low-pass rotates phase hard around the corner, and
on a bass part that has already been layered, sweeping a steep filter across the fundamental can
hollow the low end in a way that only shows up in mono. The check is in
mono compatibility, and it takes ten seconds
with a mono button.
Drive costs headroom and adds harmonics you may not want. A filter with nonlinearity in it
trades top-end cleanliness for grit, which is a fine trade when it is the point and a bad one when
it is a surprise. That is exactly why DIRTY is a switch rather than a permanent condition.
And the familiar cost: the resonant sweep is one of the most recognizable gestures in
recorded music. Use it on every transition and the listener hears the gesture instead of the
change. The best filter work in most records is the work nobody notices, sitting on a send,
removing 3 kHz from a reverb tail so the vocal stays in front.
Questions people ask
What is the best filter VST?
The category holds three different products, so decide which one you are buying first. For
surgical sweeps with no character added, look at clean multimode filters with multiple slopes.
For a filter that colors the sound, look for drive inside the path, which is where ours sits:
F(ilter)12, $49 for Mac and Windows, with the drive built into how far the cutoff travels. For a
filter that is the rhythm, look for drawable modulation and multiband operation, which is a
different product again.
What is the best sounding filter VST?
The ones people describe that way share one property: they distort as you push them, most
audibly inside the resonance feedback. That is the whole of the difference in most comparisons,
and you can test for it in under a minute by raising drive until the output is 6 dB hotter and
listening for whether the resonant peak thickens or simply gets louder. Run that on ours with
DIRTY on and then off, and the switch does the explaining for us.
What do people recommend as the best filter plugin on Reddit?
Those threads split the same way every time: a group naming one modulation-heavy plugin,
a group naming a clean surgical one, and a group pointing out that the stock filter does the job.
All three are right about different jobs, which is why the threads never resolve. The useful part
of any such thread is the sentence explaining what somebody was trying to do, so read for that
and ignore the vote counts. What almost never appears in those threads is a filter with a bit and
rate crusher ahead of it, which is the gap ours was built into.
Is there a good free filter VST?
Yes, and your DAW almost certainly has one already. Beyond that, Kilohearts Filter is free
with an account and documents each control, including that its cutoff marks the 3 dB point on a
low-pass. All of them are clean filters, so they remove and do not add. The free thing we make is
DRUGS, a
one-knob bus compressor for drums rather than a filter, and it comes in the box with F(ilter)12
as well. Most paid filters also run fully featured demos, so the practical free option is a month
of trials.
What is the best creative filter plugin?
Look for two features. One is modulation you can shape and lock to the grid, which separates
filters that make transitions from filters that make parts. The other is a resonant shape that
travels with the cutoff, which is rarer: on F(ilter)12 that is Q SHAPE, with WAH, VOWEL, COMB,
SCOOP and a DRAW mode, and the peaks ride the knob rather than sitting still under it. If instead
you want three filters moving on three frequency bands, that is multiband operation and Cableguys
builds it.
What is the best analog filter plugin?
Read that phrase as a request for three behaviors: level-dependent response, saturation inside
the resonance path, and a corner that is not a perfect textbook slope. F(ilter)12 answers all
three at the panel with POSITION, DIRTY and Q SHAPE, and we will say plainly that nothing in it
was measured from hardware and it models no specific device. Judge by the drive test rather than
by the word, since the word appears on nearly every product page in the category.
Do I need a filter plugin if I have an EQ?
For static corrective work, no. For anything that moves, yes, and the reason is design intent
rather than math. Filters map their cutoff range for sweeping, give you steep slopes worth
sweeping, and put resonance under your hand. An EQ band automated across the same range gives you
the frequency response and none of the gesture, and no EQ in your session drives harder as you
push the corner down the spectrum.
Where should a filter go in the chain?
Before saturation to make the removal permanent, after saturation to make the sweep dramatic,
before reverb and delay sends almost always, and on a bus rather than on every channel. If the
filter is fixing a problem, put it before the compressor; if it is an effect, put it after, so
the compressor is not chasing the filter.
How much CPU does a filter plugin use?
A plain resonant filter is one of the cheapest processes in a session. The cost arrives with
oversampling and with multiband designs running several filters at once. If a session is
struggling, check whether oversampling is on and whether it needs to be, and move duplicated
instances onto a group. F(ilter)12 adds zero samples of latency and runs at whatever rate the
session runs at, so it can sit on a bus without moving anything in time.
Why does my filter sweep sound like it is clicking?
Almost always coefficient stepping: the plugin is updating the filter once per audio block
rather than smoothing between updates, so a fast automation move arrives as a staircase. Lower
the buffer size to test the theory, and if the clicking scales with buffer size, the plugin is
the problem rather than the automation.
What F(ilter)12 does
F(ilter)12
is a filter with a lo-fi section in front of it and an adaptive correction on top, $49 for Mac
and Windows, AU, VST3 and standalone, with DRUGS included free. Nothing in it was measured from
hardware and it models no specific device.
The lo-fi section is the CRUSH PAIR. SAMPLE RATE slows the
rate the audio is sampled at, so the top goes and what was up there folds back down as new
content. BIT coarsens the steps it is measured in, so quiet detail rounds off
and what is left picks up a hard edge. Twelve bits is as clean as it gets, which is where the
name comes from; it only goes down from there. The background on both is in
bitcrushing explained.
The filter is one knob and a set of shapes. POSITION sets where in the
spectrum it sits, and the further it works, the more it drives and the more it sings —
built into the travel rather than dialed in beside it. CUTOFF SHAPE has five:
low-pass, high-pass, band-pass, notch, and a morph running from a closing low-pass, through
untouched in the middle, to an opening high-pass. SLOPE is a knob from 18 dB per
octave up to a wall where almost nothing gets past. DIRTY feeds the filter's own
distortion back through itself, and switched off the same filter runs clean. DRIVE,
RESO, Q and MIX do what their names say, with
RESO setting how much resonance and Q setting how narrow.
Q SHAPE is the part with no equivalent elsewhere: peaks and dips placed at
fixed distances from wherever the filter is, so the whole shape travels with the knob. WAH is one
strong peak at the cutoff. VOWEL is four peaks spaced like a voice. COMB alternates peaks and
nulls. SCOOP lifts both ends and pulls the cutoff down between them. PLAIN adds nothing, and DRAW
is your own — click the display to add a point, drag it from silence to a big boost, pull
its handles for width, and right-click it for a notch, a shelf or a cut.
Movement comes two ways, one at a time, because two things driving one cutoff means neither
knob does what it says. AUTO FILTER hands it to a clock: a shape, a division, a
grid, SWING to push it off the grid, and PHASE for where in the shape each cycle starts.
SIDECHAIN hands it to a signal instead — what it follows, what it hears,
which way it travels, how far, and how eagerly it makes up its mind.
Over all of it sits AURA, an adaptive correction drawn honestly in the
display: green where it is adding, red where it is taking away, nothing where it has no opinion.
It lives inside the filter, so past the cutoff there is none. MAX AURA is the same thing turned
all the way up. BYPASS takes the whole plug-in out.
Thirty names and no method is how those threads always end. Now you have the method: modulate
it fast, push the resonance, drive it, and match loudness before you believe anything. Then
go and do it to
ours.
F(ilter)12 — a 12 bit sauce filter for Mac and Windows: a lo-fi section,
five filter shapes, six resonance shapes and AURA.
Hear it
Keep reading
- Filter cutoff and resonance explained — The corner frequency, the slope, the resonant peak, and what each costs.
- How to make a filter sweep — High-pass and low-pass builds, automation curve, resonance, and what to sweep.
- How to use an auto filter — LFO and envelope modes, sidechain filtering, and keeping it in the groove.
- What is aliasing in audio — What it is, what it sounds like, how to prevent it, and how to use it on purpose.
- Best lofi plugins — The four jobs a lofi chain needs, and what to buy first.
- Ladder filter explained — What a ladder filter is, and the low end resonance takes away.