← Gazillion Industries/Reading material
Best soft clipper plugins
Gazillion Industries ·
The beat sounds right in the room and small in the car. So you
push the limiter three more decibels, and somewhere around the second chorus the snare
goes soft in the middle, like somebody laid a coat over the kit.
A clipper is the tool for that job. It rounds or flattens the tallest peaks where they
stand, instantly, so the transient stops growing while everything under it keeps rising.
For drums, StandardCLIP at $25 and KClip 3 at $39.99 are the two to demo first. KClip
Zero, Free Clip 2 and ClipOnly2 cost nothing. BEEFY is ours at $19, and it is a character
clipper rather than a transparent mastering one.
The short version
- Most oversampling
- StandardCLIP, $25 — up to 256x, per its page
- Most control
- KClip 3, $39.99 — eight modes, multiband, mid-side
- Free
- KClip Zero, Venn Audio Free Clip 2, Airwindows ClipOnly2
- Already installed
- Fruity Soft Clipper, Live's Saturator, Logic's Clip Distortion
- Character
- BEEFY, $19 — ours, SOFT CLIP or LIMIT as the out stage
- Prices
- read 24 September 2026 on each maker's own page
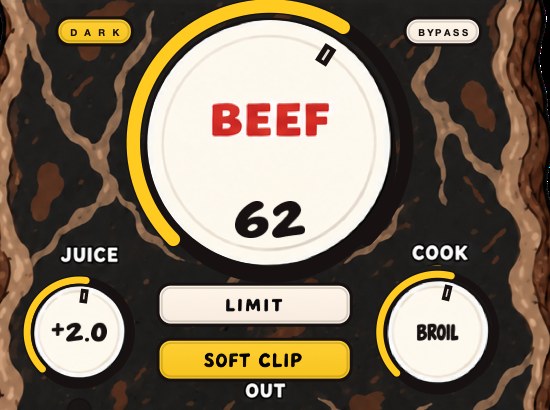 SOFT CLIP as the out stage. BEEF 62, JUICE +2.0. The clipper rounds the peak instead of holding a ceiling over it.
Soft clipper vs hard clipper
The difference is the shape of one corner. A hard clipper cuts the waveform flat at the
ceiling and leaves a sharp edge, and sharp edges throw strong harmonics a long way up the
spectrum. A soft clipper bends the peak into the ceiling on a curve, so the corner is
rounded and the added harmonics fall off faster as they climb.
What that buys and costs is straightforward. Hard clipping gives you more level per
decibel of processing and announces itself sooner. Soft clipping gives up a little of that
level and keeps quiet about it for longer. On one kick in isolation you can hard clip 3 dB
and nobody will ever know. On a full mix, 3 dB of hard clipping puts grit on every ride
cymbal in the arrangement, because the cymbals are riding on top of the kick when the kick
hits the ceiling.
So the answer to soft clipper vs hard clipper is mostly an answer about how many things
are playing at once. One source, hard is fine and often better. A bus, soft. A master, soft
and less of it than you think. The mechanism is laid out in full in
soft clipping explained, and the
wider picture in what is clipping.
One thing worth killing early: the best hard clipper plugin and the best soft clipper
plugin are usually the same product with a shape control on it. Most of the tools below do
both, and the ones that morph smoothly between the two shapes are the ones you learn
fastest from, because you can hear the trade instead of reading about it.
Clipping against limiting, and why most masters use both
A limiter turns the gain down over time. A clipper reshapes each sample where it sits.
Everything else about the two follows from that one line.
A limiter has an attack and a release, which means it has memory: what it does to this
millisecond depends on the last twenty. Push it hard and you hear that memory as pumping,
or as the room closing in between hits, or as a kick that sounds like it is being held
down. A clipper has no memory at all. Each output sample depends only on the input sample
at the same instant, so there is no gain movement to hear. The bill arrives as distortion
instead, and it arrives immediately.
Here is the arithmetic on a drum bus. Say the loudest kick peaks at −1.0 dBFS and
the bus reads −12 LUFS short term. Insert a clipper with its ceiling at −1.0 and
drive 2 dB into the input. The peaks stay where they were, everything underneath them comes
up 2 dB, and the short-term reading lands somewhere near −10. Nothing got turned up.
You spent 2 dB of crest factor and kept the level. How close to the full 2 dB you actually
land depends on how much of the material was touching the ceiling in the first place, which
is why a busy bar gains more than a sparse one. The underlying measure is in
crest factor.
In a real master chain they work together, clipper first, limiter last, each doing a
little. The clipper takes the fastest spikes so the limiter has less to lean on, and the
limiter holds the final true-peak ceiling because a clipper cannot promise one.
Clipper before limiter has the order
and the settings; true peak explains why the last
stage has to be a true-peak one.
The best clipper plugins, named and priced
The same handful of names comes back whether you searched for the best clipper VST
plugin, the best soft clipper VST or the best soft clip plugin. Here they are with the
numbers attached. Every price and feature below was read on the maker's own page on 24 September 2026.
We make one of these, which is worse than having an affiliate link, so where we have not
tested something we say so, and we have not measured any of the others.
SIR Audio Tools StandardCLIP — $25
Listed at €25 / $25 including VAT where that applies, in VST, VST3, AU and AAX, for
Mac 10.13 or newer and Windows 11 or newer. The page states oversampling up to a factor of
256. That number is far more than the job needs on most material, and that is the appeal:
at 256x you stop having to think about aliasing on the loudest thing in the record, which
is the one place where thinking about it matters.
If the question is the best transparent clipper plugin, this is the shape of answer to
look for — high oversampling, a proper ceiling control, and no tone baked in. We have
not measured it. Demo it on your own drums.
Kazrog KClip 3 — $39.99
$39.99 for the full version and $19.99 as an upgrade from a previous one. Kazrog's own
description lists eight clipping modes, multiband and mid-side processing, and
mastering-grade oversampling. That is the broadest feature set here by some distance, and
multiband clipping in particular solves a specific problem: the sub takes most of a
clipper's attention on a full mix, and splitting the bands is how you stop the bass from
eating the whole effect.
Kazrog also lists KClip Zero at $0.00, which is unusual and useful. You can hear the
family's idea for nothing before deciding whether the paid one is worth $39.99 to you.
Newfangled Audio Saturate — $49
$49 on Eventide's page, with two main controls. The one to care about is SHAPE, which
morphs continuously from hard clipping through to the smoothest curve they can compute.
That makes it the most direct way to learn the soft clipper vs hard clipper trade on your
own material: one plugin, one level, one knob moving between the two shapes while the
track plays.
The page also lists up to 24 dB of overdrive, independent input and output with auto
scaling, and an anti-aliasing mode added in version 1.10 that they describe as removing
artifacts better than oversampling does. We have not tested that claim and cannot confirm
it.
Airwindows ClipOnly2 — free
Free, no copy protection, and no controls whatsoever. Airwindows describes it as passing
every unclipped sample through untouched and synthesizing a soft entry and exit only where
clipping actually occurs, which gives a hard clip with the brightest part of the edge taken
off. The page gives the fixed clip point as 0.9549925859, about −0.2 dB. Mac AU plus
Mac, Windows and Linux VST.
Understand what it is for. There is no input drive, so it cannot make anything louder on
its own. It is a safety net at the end of a chain, catching the two or three samples a bar
that would otherwise poke through. Pair it with something that does the pushing.
Venn Audio Free Clip 2 — free
Free Clip 2 is the current version and ships as part of Venn Audio's free suite, in
Windows VST and Mac AU/VST. The original Free Clip is still downloadable for opening old
sessions, and its source is published under the GNU GPL v3, which is rare enough in audio
software to be worth knowing if you care what a plugin is actually doing to your samples.
For anyone searching for the best free soft clipper VST with an actual interface and a
drive control, this is the first one to install. It costs a download.
BEEFY — $19, and what it is not
We make it, so read this as disclosure rather than a review. BEEFY is $19, Mac and
Windows, AU, VST3 and standalone. Three knobs: BEEF for weight and density, COOK for color
and bite, JUICE for the level going in. SOFT CLIP and LIMIT are separate switchable output
stages and either can be off. New instances open with SOFT CLIP already on, JUICE at 0 dB,
BEEF at 30 and COOK at 30, so the gain staging is handled before you touch anything.
What it does not have: no oversampling switch, no multiband, no mid-side, no ceiling
control you can dial to an arbitrary number. Its output ceiling is a sample-peak limit at
−0.3 dBFS, and a sample-peak limit is not a true-peak guarantee, so a true-peak
limiter still goes after it on a master. On very bright material, feed it more gently than
you would feed a 256x clipper, because there is nothing upstairs catching the harmonics.
What it does have: the drive-it-and-it-gets-bigger job at a fifth of the price of the
broad mastering clippers, with color on the way. If your actual need is "make these drums
hit harder without the meter moving", that is the entire design brief.
BEEFY is
ours at $19, and it is a character tool rather than a transparent one. We would rather say
that here than sell you a neutrality it does not have. There's a demo on the page.
The best free clipper plugins, starting with the one already in your DAW
Searching for the best soft clipper plugin free of charge turns up a long list of
downloads. Before installing any of them, check what you already own. Every major DAW ships
something that clips, and for a first pass on a drum bus the stock one answers the
question.
FL Studio. Fruity Soft Clipper. Image-Line's manual describes it as a
CPU-friendly soft limiter that applies soft-knee compression above a threshold, and notes
that the soft knee produces saturation once the signal passes that point. Two controls:
THRES and POST gain, with an input-against-output graph that shows you the curve. The same
manual points you at Fruity Limiter when you want more transparent clip protection, which
is a fair description of the split.
Ableton Live. Saturator, which is a waveshaper with eight curve types:
Analog Clip, Soft Sine, Bass Shaper, Medium Curve, Hard Curve, Sinoid Fold, Digital Clip
and Waveshaper. Analog Clip is the smoother transition around the clip point; Digital Clip
is the immediate hard one. Bass Shaper is the interesting one for beats — it carries
its own threshold from 0 to −50 dB, stays linear below it, and Ableton recommends it
for low-frequency sources like 808 kicks and synth bass. Low threshold values give soft
clipping, high values give hard. More Live-specific routing in
saturation plugins for
Ableton Live.
Logic Pro. Apple's effects contents list Clip Distortion among the
distortion effects, with Limiter and Adaptive Limiter under dynamics. We read the contents
listing rather than the parameter page, so treat that as a pointer to go and open it, not
as a review of how it sounds.
Then the free third-party ones already named: KClip Zero, Free Clip 2, ClipOnly2. One
more worth having installed is Softube's Saturation Knob, which is free and has three
modes — Keep High, Neutral and Keep Low — that decide which end of the spectrum
gets distorted hardest. It is a saturator rather than a clipper, but Keep Low on a drum bus
does a related job, and it lives next door to this decision. More of those in
the best free VST plugins and
the best saturation plugins.
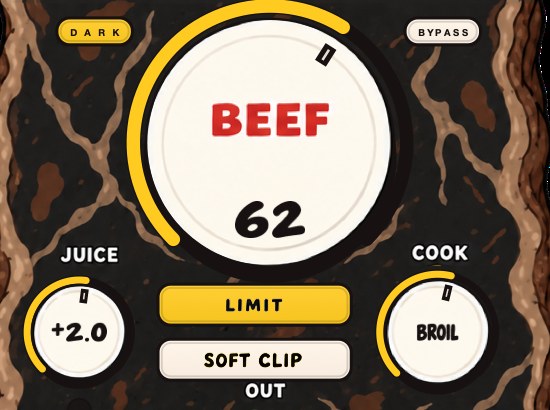 LIMIT as the out stage. Identical settings otherwise. The choice is which one catches the peak, and they do not sound the same.
The best clipper plugin for drums, and where it goes on the bus
The best clipper plugin for mixing and the best one for mastering are different
questions, and the drum bus is where the mixing half gets answered. A drum bus is where a
clipper earns its money, because a drum bus is almost entirely crest factor. Kick and snare transients are 8 to 12 dB above the average of everything
playing with them, and those transients are carrying almost no perceived loudness. Taking
them down is nearly free.
Put it after the bus compression and after any bus EQ, so the clipper is the last thing
before the fader. Clipping into a compressor means the compressor reacts to peaks you have
already decided to remove, and the two end up arguing. Set the ceiling to whatever headroom
you want to leave the bus, usually −1.0 to −3.0 dBFS, and drive the input from
there rather than moving the ceiling.
The honest amount is less than the tutorials suggest. Two to four decibels of reduction
on the loudest hits, measured on the meter rather than guessed at, is a large amount of
clipping on a full kit. You will know you have gone past it when the hi-hats start sounding
like they were recorded through a cheaper microphone, which happens before the kick shows
any damage at all. Details on the surrounding moves in
how to saturate drums and
how to make 808s hit harder.
For 808s specifically, a clipper on the sub does something a clipper on the kit does not.
A low sine spends most of its cycle near its own peak, so once it is clipping it stays
clipping for a long stretch rather than for an instant, and the harmonics that generates sit
above the fundamental where a phone speaker can actually reproduce them. That is why
clipping a sub adds audible growl and clipping a snare mostly just shortens it.
The best clipper plugin for mastering, and why the answer changes
On a master the requirements invert. On a drum bus you want character, because character
is what makes the kit sound like a record. On a master you want the level and none of the
fingerprints, because whatever the clipper does it does to the vocal, the piano and the
reverb tails at the same time.
So the best clipper plugin for mastering is the boring one: high oversampling, a precise
ceiling, no tone of its own, and metering good enough to tell you how many decibels you
actually took. StandardCLIP and KClip 3 are both built to that description. A character
clipper on a master is a choice you can make, but make it deliberately, and A/B it against
a clean one at matched loudness before committing.
Keep the amount small. One to two decibels off the loudest peaks, a true-peak limiter
after it holding around −1 dBTP, and the rest of the loudness earned upstream in the
mix. Streaming normalization will take most of what you fight for anyway — the math
on that is in how loud should my
master be and the chain order in
how to master a beat.
Oversampling, and why a clipper needs it more than an EQ does
Clipping generates harmonics above the frequency of whatever it clipped. At a 44.1 kHz
session rate, anything a clipper creates above 22.05 kHz has nowhere to go, so instead of
disappearing it folds back down into the audible band at frequencies unrelated to the
music. That folding is aliasing, and it is the single biggest difference between a clipper
that sounds solid and one that sounds brittle.
Oversampling runs the clipping stage at a multiple of the session rate — 2x, 4x,
8x and upward — so those harmonics have somewhere to live, then filters and comes
back down. It costs processor time and, in most implementations, a little latency. It is
worth it on anything with real high-frequency content and close to pointless on a sub bass
with nothing above 200 Hz, which is why the same clipper at the same setting can sound
clean on an 808 and harsh on a full kit.
Hard clipping needs it more than soft clipping, because the sharp corner generates more
energy up high to begin with. If your clipper has a shape control and an oversampling
switch, the two interact: you can often run a softer shape at 2x and get the same result as
a harder shape at 8x, for less processor time. Full mechanism in
oversampling and
what is aliasing in audio.
Transparent or character: pick before you shop
Almost every argument about the best sounding clipper plugin is two people wanting
different things. One wants the peaks gone and nothing else to change. The other wants the
drums to sound like they came off something. Those are separate products and separate
purchases, and the tools that try to be both usually do the transparent half less well.
Decide which you are buying before you open a demo. If you want transparency, judge on
oversampling quality, ceiling accuracy and how the top octave holds up at 4 dB of
reduction. If you want character, judge on what the thing does at settings you would never
use, because that tells you where its personality lives. Judging a character tool by
transparency tests will always make it lose, and judging a transparent tool by how exciting
it sounds will always make it lose the other way.
How to audition a clipper in ten minutes
- Loop the loudest eight bars of a finished track.
- Insert the clipper on the drum bus, last in the chain before the fader.
- Set the ceiling to −1.0 dBFS and the input to 0 dB.
- Note the short-term LUFS reading with the plugin bypassed.
- Raise the input in 1 dB steps until the short-term reading has risen 3 dB.
- Trim the output until bypassed and active match within 0.2 dB.
- Listen to the hi-hats and the snare tail, not the kick.
- Switch oversampling on and off at that same setting and listen to the top octave.
- Bounce the loop and play it on a phone speaker.
- Repeat on the master bus with a third of that input drive.
- Keep the plugin that stayed clean at step 7 and uninstall the others.
Step 6 is the one people skip and the one that decides the result. Every clipper ever
made sounds better than bypass when it is 2 dB louder than bypass, and the ear cannot see
past that. Matched level, and the field narrows fast. More on the metering side in
gain staging.
What a clipper costs you
Every decibel comes out of something. Push far enough and snare attacks stop being the
loudest part of the hit, kicks go blunt, and the kit starts sounding further away rather
than bigger — the tails rise because the peaks cannot, so the room comes up relative
to the hits. That reads as size for a while and then reads as distance.
On a bus there is a second cost. The loudest source at any instant drags everything
playing alongside it into the curve, so cymbals roughen on downbeats even though nothing is
wrong with the cymbals. If that is happening and you want the level anyway, the fix is to
clip the drum group and leave the mix bus alone, or to split the bands.
And there is aliasing, which is avoidable and therefore the least forgivable of the
three. If the plugin has an oversampling switch, and the source has top end, turn it on.
Questions people ask
What is the best clipper plugin?
There is no single answer and anyone giving you one is selling something. For
transparency and oversampling headroom, StandardCLIP at $25. For the widest feature set,
KClip 3 at $39.99. For nothing at all, KClip Zero or Free Clip 2. For character on drums at
a small price, ours. Prices read 24 September 2026.
What is the best soft clipper plugin for mastering?
The one with the highest quality oversampling and the least personality. On a master the
clipper touches every element at once, so anything it adds is added to the vocal too. Small
amounts, one to two decibels off the loudest peaks, with a true-peak limiter after it.
Is there a genuinely good free soft clipper VST?
Yes, several. Kazrog lists KClip Zero at $0.00, Venn Audio's Free Clip 2 is free, and
Airwindows ClipOnly2 is free with no controls at all. Before any of those, open your DAW:
FL Studio has Fruity Soft Clipper and Live has Saturator with a choice of clip curves.
The best clipper plugin free of charge is very often the one already installed.
Soft clipper or hard clipper on drums?
Hard on a single hit, soft on the bus. A lone kick can take a flat-topped clip without
anyone noticing, because there is nothing else in the signal to be dragged through the
corner with it. On the whole kit, the cymbals go first, and they go audibly.
What is the best soft clipper plugin according to Reddit?
We have not counted the threads, so we are not going to tell you what the consensus is.
Worth saying anyway: a forum tally measures how many people bought a thing and felt good
about it, which is a popularity reading rather than a measurement. Every tool on this page
has a free demo or is free outright. Ten minutes with your own drums beats a hundred
upvotes. That goes for every best clipper plugin Reddit thread, and for every best soft
clipper plugin Reddit roundup assembled out of one.
Do I still need a limiter if I use a clipper?
On a master, yes. A clipper works on sample peaks and cannot promise a true-peak ceiling,
because reconstruction between samples can overshoot after conversion. Clipper first for the
fast spikes, true-peak limiter last for the guarantee. See
how to use a limiter.
Is a cheap clipper plugin as good as an expensive one?
For the core job, often. The arithmetic of rounding a peak is not expensive to implement
well. What money buys is oversampling quality, multiband and mid-side splitting, precise
metering and a shape control worth using. If you clip one drum bus by 3 dB and never touch
a master, the cheap one and the free one will both do it. The best cheap clipper plugin for
most beat-makers is whichever free one is already installed.
Where does a clipper go in the chain?
After compression and EQ, before the limiter, last on whichever bus it is treating.
Clipping into a compressor makes the compressor respond to peaks you were about to delete.
Clipping after a limiter defeats the ceiling the limiter just set.
What BEEFY does
BEEFY is our saturation and loudness plugin for Mac and Windows, $19, in AU, VST3 and
standalone. BEEF is the main control: more weight, more density, more
loudness and more attitude as it climbs. COOK moves the color and bite
from rounder toward brighter and more cooked. JUICE sets the level going
in. SOFT CLIP is switched on when it opens and handles the initial gain
staging; LIMIT is the alternative out stage; both can be off, and input
and output clip lights watch either end.
It is a character clipper. It has no oversampling switch, no bands and no mid-side, and
its ceiling is a sample-peak limit at −0.3 dBFS rather than a true-peak one. If you
need a neutral mastering clipper, buy a neutral mastering clipper. If you need a drum bus
to sound like it came off something, that is the one we built.
Back to the car. The snare that went soft under three decibels of limiter is the one a
clipper leaves alone, because it takes the top off the hit instead of leaning on the whole
bar. Same three decibels. No coat.
BEEFY — saturation and loudness plugin for Mac and Windows. There is
a 28-second demo with three without/with comparisons on the page.
Hear it
Keep reading